Interior carpentry continues

This is probably the least interesting entry of the blog so far, but interior carpentry work has been going on for the last couple of months and I needed an entry to capture the costs associated with it. Build along with PJJ Construction have been doing most of the work and it includes such things as fabricating bamboo stair treads, cutting and installing baseboards, chopping back wall portions, and a thousand other things that need elbow grease around the site. I’ll probably do one more of these housekeeping entries before the house is complete (about 6 weeks!), but I’m trying to keep my accounting of cash outflows reasonably accurate, and hence, I’m posting this now.

Costs accrued during this stage:

Wood for interior carpentry (Plywood supply)$1,021.53
Wood for interior carpentry (Compton Lumber)$2,000.63
PJ Construction (carpentry)$7,703.95
General carpentry (Build LLC)$6,502.50
General installs (Build LLC)$6,235.00
Honeybucket rental$117.19

Drywall is complete

Thanks to Israel Avalos and the hard working crew at PJJ Construction, drywall work is now complete. The crew will be back to fix any damage caused by ongoing construction, but as of last week, all drywall is hung, taped, and mudded, and it looks great. Israel’s crew has done such a good job over the last two months since drywall work began that we are using them for a good amount of interior carpentry as well.

There isn’t a whole lot of detail to discuss about the process of hanging drywall, but we ended up going with a mix of “level 4” and “level 5” drywall around the house. Level 4 drywall installation essentially means that the finish is smooth, seamless, and fit for display in most public areas around the house. If you had an area you wanted to cheap out on like a basement laundry room, you might go level 3 there, which wouldn’t be as nice of a finish. Level 5 finish, on the other hand, is designed for areas with particularly harsh lighting conditions like huge art walls that are exposed to the sun. In a level 5 finish, the entire wall is skim-coated before it is primed. Since we have a lot of large walls that are heavily exposed to the sun coming off the water, all of these areas got the level 5 treatment.

There’s a gallery of some of the drywall pictures here.

Costs accrued during this stage:

PJ Construction (drywall)$22,353.00
Dehumidifier rental$1,017.39
Honeybucket rental$117.19
Take It Away Hauling$490.95
Miscellaneous expenses$937.81

Operation hot tub

The hot tub arrived on-site today and was promptly hoisted up to the roof by a giant crane.

Watching the crane operator from Plywood Supply gently position the spa into place with the help of several of the people on site was pretty amazing. It seemed extremely dangerous to me but stuff gets hoisted onto roofs all the time, I guess… usually without incident.

Three bald eagles showed up to watch as well, which was cool. The full photo gallery of “Operation Hot Tub” is available here.

Hot tub specifics

First let me say that comparison shopping for hot tubs sucks. There are a few web sites which claim to be “hot tub buying guides”, but most seem shady and designed to push you towards particular purchases. None seem particularly interested in taking a comprehensive look at the world of spas, from a consumer standpoint.

I made the decision to buy a HotSpring spa from Olympic Hot Tub Company several months ago for three reasons:

  • Some friends of mine have a relatively new one and love it.
  • HotSpring makes a mid-size model, the “Sovereign”, that fits into the space we had available and has a super-nice lounge seat inside the tub.
  • When checking out just about every single brand of hot tub, all of the salespeople were very quick to talk shit about other brands, but none said anything bad about HotSpring. Some even specifically said things like “Well, I can’t compete against HotSpring, but besides that, we are pretty much top of the class.”

It was this last point that ended up pushing HotSpring to the top of my list. I really want the Honda of spas here; trusty, good performance, and no maintenance. Many other tubs had a lot more bells and whistles, but I just want something that will never have to be replaced.

I can’t wait to fire this thing up. As mentioned in a previous post, the cost to run it year-round should be only about $14 a month.

Costs accrued during this stage:

HotSpring Sovereign Hot Tub$10,394.29

Siding is finally (almost) done.

I’ve gotten into a bad habit on this blog of waiting until major stages are complete or major decisions are made before posting. It makes for good, succinct reading, without a ton of incomplete updates every other day, but the downside is that I lose the ability to take advice from readers before strings are pulled. For that reason, I’m going to try and post more frequently until the project is complete, starting now.

The big news of the week is that siding is finally nearing completion. Given how many different materials I’m using and how much detail is involved, it’s taken about a month and a half to side the house so far, and there’s still probably a week or two left. Brett Deerly and the crew over at Deerly Construction have done a great job so far, often working on weekends, and pounding away in the driving Seattle rain. Getting rainscreen siding to align perfectly is a difficult task and I’m really happy with the results so far.

The specifics of the siding are as follows:

The lower massing

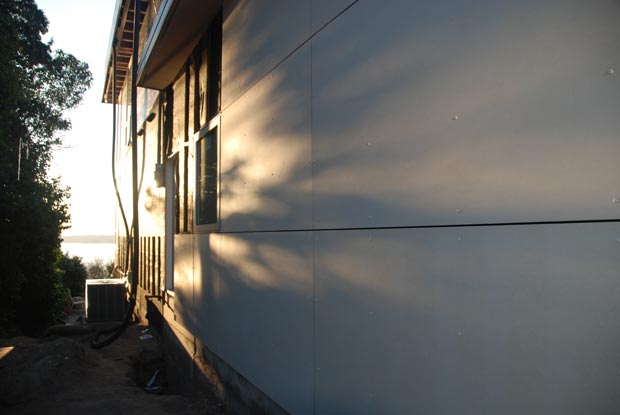
The ground level of the house is clad in rainscreen paneling made by Cembonit. Although rainscreens have been used in Norwegian architecture for centuries, they only made it to the United States during the 1950s. Within the last several years, they’ve gained popularity in American modern home design.

The concept behind a rainscreen is that you have a waterproof, Gore-Tex-like fabric wrapping your framing and then solid panels installed over the Gore-Tex. The panels catch most of the rain carrying it down to the ground while the fabric catches and repels the rest. The panels have quarter-inch gaps between them so they effectively let the whole assembly “breathe”. The idea is that you concentrate more on letting water get out of the structure as opposed to keeping it from getting in. Sealed materials like stucco try to do the opposite: keep water out at all costs. The problem with this strategy, however, in a wet environment like Seattle, is that if it fails (which it often does), it fails badly. Water gets trapped inside the stucco and you have major problems. When you see houses or condos getting their siding replaced within ten years of going up, this is usually what has happened.

Truth be told, I actually prefer the look of well done stucco or wood siding, but the practical benefits and low maintenance of the rainscreen system made it desirable for this project.

We chose Cembonit because unlike the more commonly used HardiePanel siding, it is pure cement board. There are no cellulose fibers, and thus it is extremely rigid and durable. It also comes pre-dyed in several colors, so it doesn’t require any painting (although you can paint it if you’d like).

It turns out Cembonit is not being shipped to North America anymore, but we found a place in Kentucky that had a bunch of it and got a great deal at $4 per square foot. The siding is more or less the color of light concrete… a little warmer maybe.

The upper massing

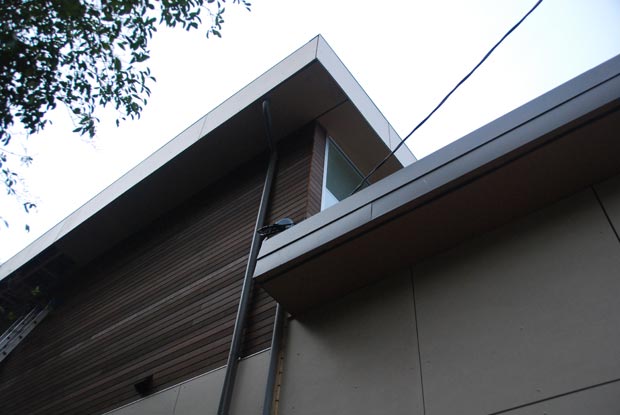
We ended up going with locally-grown red cedar, stained dark brown, for the upper massing of the house. Although I love the look of wood, I hate the maintenance of it, so we limited our use of wood siding to areas mostly sheltered by eaves. The wood will clearly see a bit of sun and rain, but not as much as other, differently-clad areas of the house. We went with a semi-transparent stain in order to let some of the woodgrain show through but still maintain a reasonable amount of protection against the elements.

One thing I’m not super excited about right now is the corner detail of the cedar siding. One side is just kind of butted up against the other side at the corner, exposing the edge grain, which is currently unstained. When the edge gets stained, it will certainly look better, but it seems like mitering the corners would have produced a slightly cleaner look. We’ll see how that one turns out though… could be perfectly fine once it’s done.

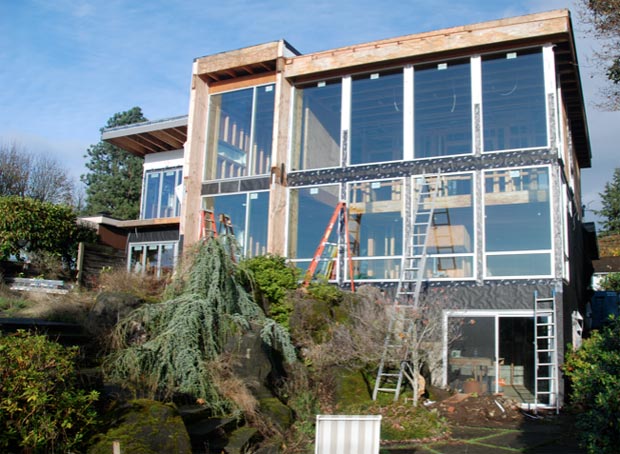
The west window wall

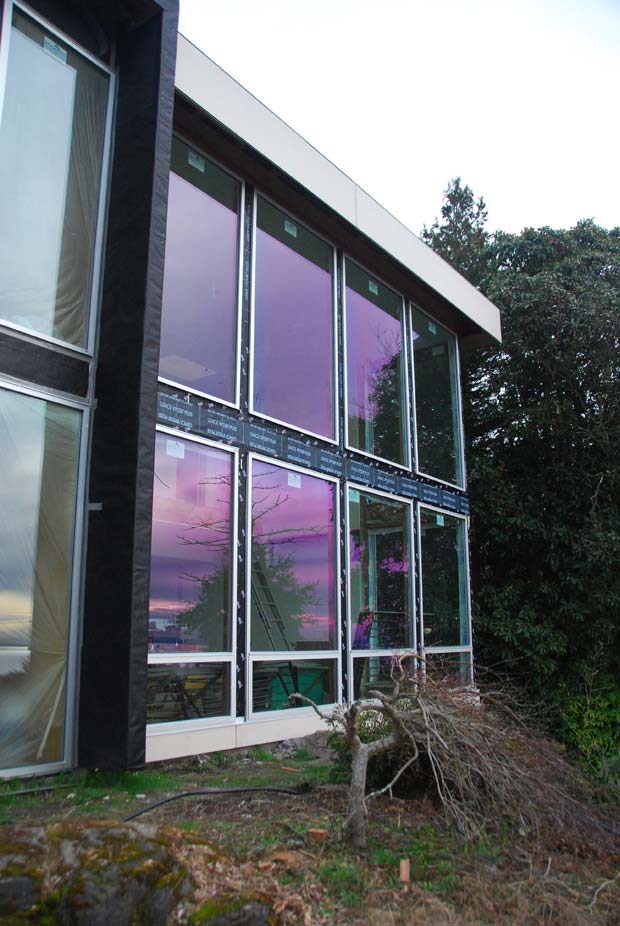
The giant wall of windows facing Puget Sound will be clad in anodized aluminum to match the window frames. This should produce a pretty dramatic, but hopefully not overly bright effect. Not that this is important to me, but I imagine this will make the house pretty unmistakable from the water and even possibly from Bainbridge Island.

The box

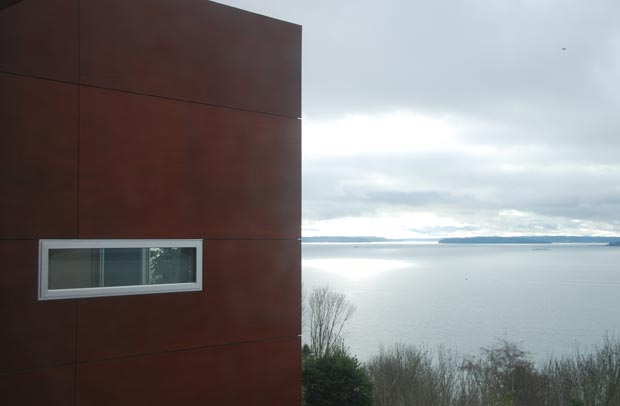
The box is the signature design element of the entire house. It’s the sort of thing you’d more often see in the design of a museum than a residence. For this reason, it was crucial we clad it in a material that was attractive and wouldn’t weather with the elements. Build initially pushed hard for brazilian ipe, but I was too afraid of what it would look like when it inevitably silvered. Part of the challenge of the box, is that some of it is inside and some of it is outside. Some faces east, some faces west, some faces north, and some faces south. Its exposure to the elements is very uneven and so it was important to choose a material that would stay as pristine as possible no matter what exposure it received.

I also didn’t want any more cold, industrial material like metal because I’m trying to keep the house warm looking (often a challenge in modern home design).

The only material that fit the bill perfectly was something called Prodema. Prodema is, according to the company, “a high-density panel comprised of a thermosetting phenolic resin bonded cellulose fiber core faced with natural wood that has been coated with Prodema in-house formulated acrylic resin-PVDF protective finish ensures a panel colour fastness of 3-4 in a 3000 hour xenon lamp test (by NEN-ISO 105-a03) and perfect resistance to loss of gloss (by DIN 67530).”

In other words, it’s a mostly synthetic panel with a real wood veneer that is maintenance-free and extremely resistant to water and sun. Real wood without the trouble of real wood. I’d seen Prodema on a couple of other houses in Seattle as well as some commercial applications and it always looks great. I’ve heard some stories about Prodema failing, but the warranty should take care of that if it happens.

Another challenge we had when deciding how to wrap the box was how it would carry through to the inside of the house. In the end, we decided to wrap it a couple of feet into the interior, on all sides. Carrying it along the entire interior of the box would have looked dramatic, but it was too risky and too ripe for looking dated more quickly.

And finally, I would be remiss if I didn’t mention that there is a similar material called Ecoclad that is made less than an hour away in Tacoma that we could have used instead of the Spanish-made Prodema. Unfortunately, however, the company refused to send us any samples, and I’ve heard from others that they are very difficult to deal with. Such a huge wasted opportunity to use a local material. Thanks for making me ship over a $14 per square foot product from Spain instead.

It’s going to take me awhile to put together the timelapse of the siding but I’ll post it as soon as I have it. For now, there are photos in the gallery.

Costs accrued during this stage:

Cement Board Fabricators (Cembonit)$13,581.42
Specialty Forest Products (cedar siding)$4,972.92
Prodema siding (Formas)$15,237.14
Pacific Delivery Service (siding)$359.78
Snyder Architectural Systems (siding wrap)$1,730.69
Brett Deerly (siding labor)$21,581.78
Excel coatings (stain and treat cedar with Benite)$1,752.00
White Cap Construction Supply (siding supplies)$265.67
Lumbermen's ProBuild (siding supplies)$339.52
Blackstock Lumber Co., Inc (siding supplies)$44.42
Precision Fabricators flashing (siding supplies)$521.22
Miscellaneous siding supplies$1,244.56
Heavy equipment rental$912.53
Aluminum siding (Special Projects Division)$3,419.62
Compton Lumber (siding materials)$426.70
Aluminum anodizing (Hytek Finishes)$360.00
Scissor lifts (United Rentals)$1,540.36
Additional siding labor (Brett Deerly)$1,863.60
Miscellaneous expenses$379.68
Hauling$680.62
Honeybucket rental$117.19

We Have Fire

Drywall is almost done and siding is finishing up, so I thought I’d write a little about the fireplace that was installed several weeks ago and how we picked it.

Before we took down the old house, there was a bit of discussion about keeping the old wood burning fireplace. I don’t mind traditional fireplaces at all, and the existing one carried with it the benefit of being able to heat both the basement and the main floor. In the end, however, the masonry just took up too much space and didn’t fit the overall design plans. I was not sad to see it go, but I think Build might have shed a tear.

The old hotness

In shopping for a new fireplace, it quickly became clear that if I wanted something that wasn’t going take up a whole lot of room, a gas or denatured ethanol burning one was the way to go. Although the ethanol burning ones were really sharp looking and flexibly designed, it seemed silly to buy one considering I’m already running a natural gas line to the house. The choice between never refilling my fuel supply and doing it every few/several weeks was easy.

When it comes to natural gas fireplaces, you can either go with direct-vent or vent-free. In a direct-vent setup, air is drawn in from outside the house while the fumes are blown out the same way. In a vent-free setup, air is drawn from the interior of the house, heated up, and then blown back into circulation. While vent-free fireplaces are generally thought to be safe enough, they do reduce the oxygen level inside a house, and some people point to this as a potential hazard. They are also a potential carbon monoxide hazard if improperly designed. For these reasons, it didn’t make any sense to go vent-free, considering running a vent was relatively easy.

Another important safety consideration is purchasing a fireplace that is “UL Listed”. This designation means that an organization called Underwriters Laboratories has tested the product for safety. Many insurance companies will not cover damage caused by non UL Listed fireplaces, so unless you’re not worried about burning your house down, it’s best to stick with UL Listed equipment.

If you’re looking for a direct-vent gas fireplace, your options are abundant. There are probably 1000 models to choose from. If, however, you want a modern looking one without fake logs or other distracting elements, your choice of manufacturers drops to about 4. Not only that but your price explodes into the ridiculousphere.

To see what was out there and how much it would cost, I contacted three fireplace dealers in Puget Sound and was less than impressed with the results. Two of them had nothing modern and weren’t particularly interested in pointing me elsewhere. The third one, Kirkland Fireplace, was even worse. I called to explain what I was looking for, and the guy on the other end told me he’d e-mail me some models to choose from. After a week, I still had not received an e-mail from him. Then I called again, told a new guy what happened with the first guy, and after apologizing he said he would send me the information. One more week went by with no email, no phone call, and no other follow-up from Kirkland Fireplace.

I don’t understand how a place like this stays in business. It’s like I’m calling them up and saying “Here, I have $5000 I want to place into your hands” and they are saying “Thanks, but we’re playing X-Box right now.” Especially in the middle of a severe economic/housing downturn, it shocks me that a place like this would be so unresponsive to unsolicited business. If you’re looking for a fireplace, I would stay away from Kirkland Fireplace.

After researching the options from Montigo, Spark, and Lennox — the only UL-listed modern gas fireplaces available in the U.S. — I happened upon the spankin’ new Heat & Glo site.

“Heat & Glo” you say?!?!

Yes! The trusty old manufacturer of fireplaces your grandparents would own.

Turns out Heat & Glo now makes a line of sharp looking modern fireplaces at convenient sizes and lower price points than their competitors. There were two models that looked great: the Red 40 and the Cosmo SLR. Both models were similar in appearance but the Cosmo was less expensive and didn’t have the crazy LED stuff I didn’t need. At just over $4000 delivered and installed, the Cosmo SLR was less than half the price of some of the other options (again, I can’t believe how expensive a simple gas burner can be if it’s marketed as “modern”… non-modern models can be had for $750).

Upon deciding to go with the Cosmo, the only question was where to purchase. Thankfully, I found Bill at Fireside Hearth & Home who hooked me up, delivered and installed the thing within three weeks, and gave me great service along the way.

The new hotness (photo from Heat & Glo)

The fireplace isn’t connected yet because we’re still waiting for the gas line, but it’s sitting pretty, ready to light up the living room right now. We’ll be hooking up the gas line and installing the blackened steel fireplace surround in the coming weeks.

UPDATE: For a look at the finished fireplace, complete with custom blackened steel surround, see this post.

Costs accrued during this stage:

Heat & Glo Cosmo SLR Fireplace$4,319.78

Roofing complete. Doors are on.

Upon returning from a two week vacation in Peru and the Galapagos Islands a week ago (which was awesome), I was pleased to see all of the progress that was made in my absence. The roof is all done, the siding is beginning to go up, insulation is in, the drywall is being hung, and best of all, the big metal container that’s been in front of the house partially obscuring the livecam is gone!

Roofing

The house has four roof surfaces: the south roof, the north roof, the roof deck between those two roofs, and the garage roof. The north roof and the garage roof are standing seam shed roofs in a warm grey tone. The roof deck will be clad with Trex Brasilia espresso synthetic wood decking. I feel pretty good about these three surfaces.

The only roof I’m still not quite feeling is the south roof. It’s almost flat so it wasn’t a good candidate for standing seam metal, so we went with a white single membrane surface. The white doesn’t look great but at least you can only see it from the roof deck. On the bright side, you can easily walk on the roof and it will also be easy to install solar equipment — which I’ve pre-wired for — when the economics make sense. My main concern with this roof is how the edges look from the street. The edges require a noticeably different treatment than the edges on the shed roofs, and I’m just not feeling the gestalt yet. The plan is to edge the south roof with the same Cembonit cement board panels we’re using on the rest of the house. We’ll see how it goes. I’m reserving judgement until the siding is up and I can see how everything meshes together.

My roofing contractor is Nate Dowers Construction and they have done a bang-up job so far.

UPDATE (5/1/2010): We decided to turn the south roof into a matching standing seam metal one after all. It cost us a few thousand dollars more but it looks better and should last longer than the membrane version. Looks great!

Doors

There are a few different types of doors in this house:

  • Solid-core interior hinged doors
  • Solid-core interior pocket doors
  • Raumplus glass sliders (for laundry, office, and media rooms)
  • Standard exterior hinged doors
  • Huge, super-awesome front doors

So far, everything except the Raumpluses have been installed. The hopefully interesting details are as follows:

  • We ended up going with the Linnea Pocket door locks and they aren’t as bad as I feared. Quite acceptable really, as far as pocket door interfaces go.
  • For the standard interior doors, we went with Karcher Cyprus handles. They are clean looking and feel good on the palms.
  • For the huge, super-awesome front doors, we went with a double-door made of fir veneer. Veneer is apparently much stronger and more resistant to warping than solid wood so that’s what people usually go with these days. The doors are almost nine feet tall. They feel majestic. We’re waiting until the siding and a few other details are done before picking the exact stain color. Some people might choose aluminum framed glass doors for a house like this, but for some reason, I just feel like a house should have wooden doors. Aluminum with glass feels too much like a retail space to me.
  • For the front door hardware, we’re going with the Omnia Urban which looks sharp and meshes nicely with the NanaWall hardware.

Scope additions and shifts

Several items related to carpentry, installation, and various other areas of labor have been shifted in the budget from subcontractors to Build as they’ve taken tasks on themselves. I’m happy to have team Build tackle this stuff because of the high level of work they’ve exhibited so far. Additionally, we’ve added $4000 to the construction management budget — bringing it to $99,000 — to cover a lot of the extra coordination that is going into this project. I’m happy to increase the construction management fee modestly in this way as I feel I’ve gotten plenty of value for the money.

Costs accrued during this stage:

Nate Dowers Construction (roofing labor and materials)$37,008.92
Additional material to convert south roof to metal$2,715.00
Compton Lumber & Hardware (doors)$11,337.39
Builders' Hardware & Supply Co, Inc (door hardware)$2,394.94
McMaster Carr (closet door pulls)$121.64
Miscellaneous expenses$2,007.89
Printing fees$268.65
Honeybucket rental$117.19
Build LLC (various installs, carpentry, doors, labor, etc.)$7,532.50
Build LLC (additional construction management fee)$4,000.00
Gale Contractor Services (insulation)$4,561.78

All sealed up

It’s been raining like the bejayyyyysus in Seattle over the last week or so, but thankfully, the majority of the house has been sealed up just in time. Last week, the framing crew at Alexander’s Custom Homes along with Build themselves, installed the following:

The largest of the Marlins weigh 350 pounds and measure approximately 9 feet by 9 feet. Unfortunately I wasn’t there to film the action, but from what I understand, it took a crew of seven to jostle some of these giant glass forms into place. I find it amazing that not a single pane was damaged or dropped.

I know I routinely say good things about Build, but when a four man design/build shop shows up on site to help physically install 350 pound windows, that is pretty special… and these guys aren’t exactly Lou Ferrigno either (check out Kevin’s arms). They also saved me a ton of money when some of the windows showed up unexpectedly unglazed due to their weight. Calling a full field glazing team in to remedy the situation would have cost several thousand dollars, but because Build provided additional sweat equity, two field glazers were able to install everything in a few hours.

For some specifics on all the glass, read on…

The windows

The State of Washington made things very easy on me, decision-wise. If you have a two-story space to glaze and you specify aluminum frame windows, there is exactly one kind of window which meets the Washington Energy Code: the Marlin 1505 Series. While this is not good from a “shopping around to get the best value window” standpoint, it’s good in that it’s one less decision to make.

Energy codes are a controversial subject. Especially in states like Washington and Oregon, some people say the codes are so strict that they dramatically increase the price of construction without proportionate reduction of energy footprint.

The Marlins have a U-value of 0.35 which is right at Washington’s limit. Smaller inoperable vinyl windows can get down to 0.15, but who wants a bunch of small, inoperable vinyl windows on their house?

The windows were supplied by Goldfinch Brothers out of Everett, WA and Marlin themselves are a Spokane, WA company so it was nice to buy local.

I will not be throwing stones anytime soon.

The NanaWalls

The Nanas are one of my favorite elements of the house. A NanaWall is essentially a sliding glass door that folds away like an accordion instead of sliding. The upshot of this is that the entire passageway can be opened, unlike a sliding door which is never really more than halfway open at any given time. Another nice feature of NanaWalls is that the first pane swings outward like a standard door so you can open and close it with ease. NanaWalls are especially good choices when you are trying to seamlessly connect outdoor space to indoor space, as I doing with my patio and north kitchen area. They are a little more expensive than Fleetwood sliding doors but worth it, in my opinion.

Yes, there will eventually be a safety rail and a proper deck here.

The Milgard sliders

NanaWalls notwithstanding, there were still a couple of spots that needed standard sliding doors: the basement and the dining room. When you look at Milgard sliding doors, “standard” is about the only word that comes to mind. Inexpensive and unremarkable. Kind of like anything from Old Navy.

Motorized skylights

As you can probably tell, the house isn’t exactly starved for light, but in the summer, it is critical that it has proper ventilation. In order to suck cool air in and draw hot air out, we made part of the lower west glass operable and installed two motorized skylights at the top of the double-height great room.

The skylights will be tied into the Myro home automation system as well as open and close in reaction to heat and rain.

The roof hatch

What can I say. It’s a big ugly steel hatch leading up to the roof deck. Roof access is rarely a pretty thing and this is no exception, but it gets the job done with as small of a footprint as possible.

What’s next

Now that the house is 95% dry, the space around the window frames will be waterproofed this week and the entire house will be sheathed in waterproof fabric. Once the house is all covered, the rainscreen paneling and metal roof will be installed. There should be lots of progress on the livecam for the next two weeks.

I’ve also update the gallery with shots of all the new glass.

Costs accrued during this stage:

Marlin windows and Milgard doors$47,052.15
NanaWalls (parts)$16,554.00
NanaWalls (deposit for install)$739.13
NanaWalls (remainder for install)$739.12
NanaWall Screens$2,978.00
Bilco roof hatch$5,489.56
2 Motorized skylights$2,414.48
Distinctive Windows, Inc. (field glazing)$525.60
Precision Fabricators (flashing)$657.06

Getting wired

This is shaping up to be a pretty exciting week, with windows, Nana walls, and the metal roof all going in simultaneously. While there hasn’t been much to see on the livecam over the last month, action should pick up strongly today. The house should be more or less weatherproof by Friday!

Meanwhile, one of the most interesting aspects of the house has been coming together over the last several weeks: the electrical rough-in. Wire by wire, Tom Bell and the team at Thomas Bell Electric have been outfitting every nook and cranny of the house with lighting cans and future-proof circuitry. Tom’s original contract was to just do lighting and high voltage work, but the crew has done such a good job — and at a reasonable price — that I’m having them do low voltage and security system wiring as well.

So, onto the details…

Data

There are a few options for dealing with your house’s internet/data connectivity these days: cat 5e cabling, cat 6 cabling, fiber, and wireless. Several years ago, cat 5e was the standard as it supports up to about 350 Mb/sec. Cat 6 is a bit faster and supports gigabit transfer rates, but the downside is that you can’t run your telephone connection through it, as you can with cat 5e Turns out you can! Thanks Karl!. Fiber is the fastest option, but it’s even more expensive and it’s debatable when it will provide a clear advantage over cat 6. Wireless is the easiest and cheapest option, and it’s what most people choose when remodeling or trying to otherwise retrofit a house without mucking around inside the walls. Wireless is currently plenty fast enough to handle everyday internet connectivity, but topping out at about 50 Mb/sec, it’s far below actual cabling. Wireless connections are also inherently less secure than hardwired connections.

In order to stay reasonably future-proof at an affordable cost, we went with one cat5e and one cat6 to almost every room in the house. Additionally, there will be enough wireless base stations around the house to get a signal wherever you happen to be (probably two).

wirecloset

I did not even have a wide enough angle lens to capture all of the wiring in the control closet. Here is a sample.

Video

For TV signals, the only game in town is still good old fashioned RG6 (coaxial) cabling. Cable TV providers only require one cable per TV/DVR while satellite providers require one cable per tuner (so you’d need to plug two cables into your DirecTV DVR in order for both tuners to operate). For this reason, we are running two RG6s to most rooms and four lines up to the roof in the likely case we go with satellite as the TV source. Note: apparently DirecTV now allows you to use one cable per DVR in their newer systems, but it’s still a good idea to have that extra jack.

Audio

Even though it seems a bit excessive to me, we are wiring almost every room in the house for sound. We’ve opted for the Russound CAM6.6 system with UNO-S2 keypads and mostly Russound Ratio speakers. I spec’d out 15 zones but we’re keeping it limited to 12 for now because for every 6 zones, you need to buy a new (expensive) controller.

What’s nice about the Russound system is that it’s all controlled via IP, it sounds great, and it ties directly into the home automation setup we’re building around Myro (there will be a separate post on this shortly).

Security

I had a security company come out to the property and bid on installing an alarm system for the house, but the results were less than satisfactory. The company wanted a couple of thousand dollars to install everything but would only do it if I signed up for a 5 year monitoring agreement at $41 per month. That just seems really excessive to me, and I know monitoring can be had for as little as $8.95 a month elsewhere. That combined with the fact that the HAI Omnipro II I’m purchasing already has security capabilities built into it made this alarm company’s offer a no-go. Instead, I’m having Tom run all the security system wires and we’ll just hook everything into the Omnipro ourselves. Big thanks to my friend Danny Mavromatis (creator of Myro), for helping design all of this low voltage stuff and leading me through the maze of products necessary to make all of this happen. And of course, big thanks to Tom and the crew at Thomas Bell Electric for everything they’ve done over the last few weeks.

As you can probably guess, this is an item we’ve overshot our budget on by a substantial amount, but since everything else has come in on budget or below, it seems worth it. Wiring the basement wasn’t part of the original scope and neither was an extensive audio, security, and home automation system, so if this is the one phase we spend a little more money on, I’m ok with it. Technology is more important to me than expensive chandeliers, and it’s also a lot harder to “fix” after the fact, so getting it perfect at this stage is critical.

Costs accrued during this stage:

Electrical rough-in and installs$52,384.82
Honeybucket rental$117.19
Miscellaneous expenses$95.21

Making pocket doors a little less shitty

In order to save space, we’re using some pocket doors around the house, most notably for bathrooms. Pocket doors are great in that they never swing into anyone or anything, but they’re a bit shitty in that they’re tougher to operate than standard hinged doors. Pulling the door out from its sheathing when it’s fully open requires some sort of mechanical pull and locking the door requires using one of the pathetic excuses for locks that comes with most pocket door installations.

The hardware I speak of is downright garish in most instances. Here are some choice samples:

The “Hurt Locker”. A cheaply made, tiny knob, that is really only meant to be used in emergencies. And by emergencies, I really have no idea what I mean… hiding from your little sister maybe.

The “Coyote Ugly”. Made by Kwikset so you know it’s got bite, but also tacky looking with those visible screws.

The “Modern Problem”. Linnea seems to be a favorite among contemporary architects, but it still lacks a reasonable sized user interface.

The “Italian Job”. I actually like these “privacy snibs” from Valli & Valli but have been told they are like Ferraris, and not in the good way.

After many days of searching, I think I found the one pocket door lock that may ideally fit the bill:

Behold the Halliday Baillie HB 690 Privacy Lock:

Now that is a bathroom door lock that says “feel free to pull your pants down in here”.

It looks sharp, it’s got a nice up and down slider interface that exudes security, and it has a built in hinge with which to pull it from its sheathing. Really, really sharp. Gotta hand it to the New Zealanders. I will be checking prices and feasibility with Build tomorrow, but barring any bad news, I think the Halliday Baillies are the winners.

Choosing a deck surface

So far, none of my house-building research has yielded more negative information than deck construction. Everyone seems to hate their deck. People who have wood decks complain about having to stain them every year or two, and people who have composite decks complain about the material not being maintenance-free at all.

I’ve researched no fewer than 10 brands of composite decks and also looked into ipe and cedar, and there just doesn’t seem to be a clear winning option. It’s all about tradeoffs. The one thing I’ve decided I definitely don’t want, however, is a faded (“silvered”) deck. Some people like the weathered look. I don’t. Therefore, ipe is unfortunately eliminated. It’s a shame too because ipe is generally regarded as the most durable wood one can buy. Unfortunately, however, ipe is so dense that it doesn’t take stains or protectants very well, so it is recommended you just leave it alone and let it fade to its natural patina. No thanks. I’ve heard of people using a product called Penofin to keep Ipe brown, but treatment must be frequent and results seem to vary.

Cedar is the other wood to consider, and while I think it would provide the best looking deck out of any of the options, it would require the greatest amount of maintenance, and I’m not sure I want to sign up for that.

From there, we get into the composites. Trex is the best known name in composite decking, but it’s also the company that receives the most negative reviews and has been successfully sued for misrepresenting the quality of its product (actually, they settled out of court, but whatever). After Trex, there are a slew of companies selling their own variation of a composite deck, each one made with slightly different materials and esthetics in mind.

This is allegedly what a Trex deck looks like. In reality, it is significantly less impressive.

I found it next to impossible to find objective, scientific studies comparing deck materials, but it turns out Consumer Reports did a reasonable study on the subject recently. By the way, if you’re building a house, buying an online subscription to Consumer Reports should be one of your first expenditures. The study took many different brands and exposed them to sun, wind, and rain over the course of several years. The results varied wildly, with some decks holding up admirably and others literally disintegrating to pieces. The material which came out on top is called Symmatrix by Dow Chemical. To my surprise, however, I found out the product has been discontinued, despite its great rating. Unbelievable… and a bit suspicious, to be honest. Why would a seemingly great product be abandoned by its producer? If anyone knows, please post in the comments.

The only other brand that scored nearly as well in all of the areas important to me was something called Timbertech. It’s especially good at mildew resistance, and that’s key. Unfortunately, Kevin at Build brought me a sample of it today (along with some Trex), and it has a fake grain texture to it that seems a bit chintzy. I may look at some more samples, but this particular one didn’t look great.

Here is the concerning part though: do a Google search for Timbertech, Trex, or any other brand of composite decking and you’ll see loads and loads of very detailed complaints. The ratio of haters to lovers seems troublingly high. It’s enough to make you want to ditch the idea of planks altogether and go with concrete pavers or something.

I’m not sure where I’ll end up yet, but I’d say so far, I’m favoring Trex, then Timbertech, and then cedar. Would love some first-hand opinions from anyone who has their own deck, so if you have one (a deck or an opinion), please feel free to post your thoughts below.

Incidentally, the best article and discussion I found on the subject was from Fine Homebuilding Magazine.