Archive for the ‘Milestones’ Category

It’s Official: Time to Start Thinking About a House

Today, the startup I founded two years ago was acquired. Thousands of hours of hard work paid off in the form of a few bucks, and we’re all extremely humbled to be among the small percentage of startups that haven’t fizzled out and died.

I’m not a big spender and I have no desire to go out and buy a new car, but this is the first time in my life when I’ve been able to even think about buying or building a house. I’ve been living in apartments and condos since college so the prospective of actually owning some land is starting to look more attractive.

This blog will chronicle the process of buying, remodeling, and/or building a modern home from identifying the property right up until moving in.

Offer Accepted!

Well what do you know? Bidding $150,000 below the asking price was a good idea! The seller accepted the bid without even countering. Had I listened to my agent’s advice, I’d be on the hook for an extra $100,000.

Lesson: If you feel your real estate agent isn’t correct in their negotiating advice, follow your own intuition.

So now that we’re officially under contract, I have five business days to complete any inspections I’d like to conduct. Since this seller refuses to sign a Seller’s Disclosure Statement, I’m going to be extra careful. If any inspection comes up less than roses, I may back out. I’m planning the following inspections:

In addition, I’ll be calling two groups of architects and builders out to the property to give me their initial thoughts.

Jackpot

While puttering around the neighborhood today, I received the following text-message from my agent:

“Off-market opportunity with commanding view. Can u meet in 45 mins?”

I called him back to confirm my availability and get a quick overview of what we were going to be looking at. Apparently, it’s an estate sale, hasn’t been lived in in a couple of years, needs quite a bit of work, but sits on a large lot with a jawdropping view of Puget Sound. It is currently being prepared for market, but the sellers (four beneficiaries) have not signed on with an agent yet or communicated a price.

Upon hanging up with my agent, I turned to my girlfriend and said “I have a good feeling about this.”

Love at first sight

45 minutes later, we met my agent several blocks from the property and drove over in one car. Upon arriving, the first thing that struck me is that the house is only a few steps away from one of the nicest parks in Seattle. I don’t spend a whole lot of time in parks, but it’s certainly a nice amenity to have at your doorstep.

The house itself — from the front — was quaint in its own way but unremarkable. Built in the early ’50s, it was conceived in what I would consider an architectural dead spot: right between the brick Tudors of the ’30s and ’40s and the wonderful mid-century moderns of the late ’50s and ’60s. It has a carport instead of a garage, sits very low to the ground, and is covered in a combination of old-growth wood and period-popular stone siding.

Entering the house exposed right away both the greatest and worst things about it.

On the great side, the view is about as spectacular as I’ve ever seen in Seattle. It’s a full 180 degree Puget Sound view spanning from Alki beach to the south all the way past the north point of Bainbridge Island to the north. Almost as amazing as the view itself is the fact that the backyard drops right off a 300 foot cliff so no one can ever block your view. Additionally, the house is completely separated from its neighboring structures on both sides by beautiful foliage.

The view facing west before sunset. Apparently, bald eagles perch on the tree to the left.

On the bad side, however, the layout of the interior squeezes four levels into two stories, one of which is a daylight basement. Essentially, there is the daylight basement, then two bedrooms a half floor up, then the main floor another half floor up, and then two more bedrooms another half floor up. Because of all the half floors and the staircase that connects them — right down the middle of the house — the great room and other areas are chopped up a lot smaller than they could be. Without that staircase and one of the levels, the great room could be 2-3x as roomy and open. Additionally, although the house is in fine shape, it hasn’t been updated much at all since it was built.

With the above and about 100 other considerations and details in mind, this house is the first house I’ve seen which feels unconditionally like a place I could live in for the rest of my life. Much better than the last house and also the first house.

Meeting the seller

While at the house, I got to meet the seller. He is one of the four beneficiaries of the estate and the one officially handling the sale of the house. He’s an attorney (as were his parents and as are two of his siblings!) and a really down-to-earth guy. I asked him for some historical stories about the house and he told me that he had lived there from age 5 or 6 all the way up until college. He also showed me a great Sony reel-to-reel tape player and phonograph from 1960 which still sits in the living room. I told him if I ended up buying the house, I wanted to showcase that stuff in the new living room.

In talking to the seller, I could tell this had been a special house to a lot of people and it was a tough decision for the family to sell at all.

Not a question of if, but how

After we left the house and my girlfriend and I discussed it for a few minutes, the question wasn’t if I would make a bid, but instead how and for how much. The seller hadn’t signed on with a selling agent yet and was still auditioning several of them, so there was still a possible opportunity to save him some sell-side commission and thus get the house at a lower price.

I’ll be writing up an offer of some sort tomorrow. So psyched.

Over the Goal Line!

After a marathon day of golfing for charity, negotiating, driving, and executing documents, we finally have a deal!!!. In the end, I agreed to pick up my agent’s commission and also indemnify the seller against any claims or lawsuits coming from the real estate agent he didn’t sign on with, and he agreed to put a clause in the contract which allowed for reasonable extension of our closing date if circumstances beyond my control prevented closing by the official closing date of July 31st. This clause was very important to me as I waived my financing contingency and put $100,000 down in earnest money. If some shmoe at a bank fat-fingers a few keys and causes this thing to close on August 1st instead, I don’t want my earnest money to be at risk.

The indemnification thing is a bit of a calculated risk for me. Essentially, this other agent feels he should be compensated as the selling agent even though he was never retained by the seller. I have worked out a deal with my agent to pay this agent a .5%-of-selling-price referral fee out of his commission so everything should be good, but I understand why the seller would ask me to indemnify him. I don’t like having to do it and I don’t think any lawyer would advise anyone to ever do it, but I figure the chances are tiny that it becomes an issue, and even if it does, the amount we’re talking about is just 3% of the sales price. It’s not a trivial amount, but it’s not millions of dollars either. I will just have this other agent sign a release form before releasing his referral fee from escrow. Since both my agent and the real estate office that they both work for have confirmed to me that he has no claims to any commission, I’m not worried about it.

As for the deal itself, it was signed about an hour ago, at around 11pm and I’m still in shock that it came together. The seller and I both drove out to the real estate office, and as I was waiting for him to show up, I honestly thought that there was a chance he was going to take our signed offer and just sit on it over the weekend as the property went on the market. To his credit however, he read over the deal, faxed it immediately to his sibling that was the executor of the family trust, got it signed and faxed back, and congratulated me on being the new owner of their beloved home.

It’s such a great feeling to have made it through this process. By taking matters into my own hands and not allowing myself to be governed by the customs of the real estate industry, I have a once-in-a-lifetime house at a great price from a great family.

The stress isn’t over quite yet though. I have five business days to do the geotech inspection to make sure this house isn’t about to fall off the cliff and only a few weeks to close financing.

Picking an Architect

Although I’ve spent a bit of time over these last several months researching and interviewing architects, the complexity of picking a firm didn’t hit home until I realized how different each one is from the other. Being a designer myself, I felt a rapport with almost all of the 8 firms I talked to, and I had even “soft settled” on one of them for a couple of months, based mainly on how much I like the principals personally and how great their portfolio was.

As the prospect of building became more and more certain though, I felt I still had some homework to do, specifically around the subject of pricing. High end custom home architects have an awful reputation for designing without cost consciousness in mind. I’ve talked to people who’ve gone through it first-hand as clients as well as other people in the construction industry and most seem to agree that although architects are very important to the process of building a house, most are not overly concerned with building you a nice house as economically as possible, but rather building the most impressive house they can, with overspending as the main by-product. I know not all architects are this way, but from personal accounts, I also know that many are, and that’s why I have to be extra careful. Since I don’t want to spend a million dollars on construction, finding the most cost-effective high end architect has quickly become the most important part of this project.

Following is everything I’ve learned about architects over the last several weeks:

→ Read the rest of this entry

Architecture Contract Signed

Alright, Build LLC and I are now officially signed up to build a house together. It feels great to have such an important part of the process taken care of.

One of the nice things about Build is that Kevin Eckert and Andrew van Leeuwen — the principals — are very transparent about how long things will take and how much they will cost. When I went in to sign the contract with them, Kevin gave me a spreadsheet of where all time and money was expected to go, even though we were going with a flat-fee structure of $48,000. I won’t list every line item in the document, but the main sections are as follows:

  • Information Gathering and Documentation: $3,220 (42 hours)
  • Schematic Design and Design Development: $29,440 (370 hours)
  • Construction Documents: $10,430 (126 hours)
  • Pre-construction Services: $800 (8 hours)
  • General Conditions: $2790 (30 hours)
  • Contingency: $1,500

All of that adds up to $48,000, which I will be paying as I go, every month. The initial deposit, which I will pay today is $9600.

Costs accrued during this stage:

Architecture services$48,000.00

Permits Issued!

Almost 5 months after applying for building and demolition permits, the City of Seattle finally granted me my documents last week. With barely any permit applications going through the City these days, one would think things would have gone quicker, but in reality, I feel like the lack of permit flow caused more city scrutiny in the end. The main issue that dragged things out was something I wrote about a little while ago: indemnification.

In short, since part of my property is in an “environmentally sensitive area” (i.e. near a cliff) the City insisted that I sign a covenant running with the land that did many things I felt were overreaching and unnecessary. I understand why the City’s standard procedure is to ask for this (and most people accept it as is) but it contained two particular things that my attorney, Patrick Moran, was thankfully able to negotiate out:

  • A clause stating that if anyone sued the City for anything relating to the issuance of my permits, I had to indemnify them and pay for all legal fees, judgements, etc.
  • A clause stating that this covenant ran with the land and if I ever sold the property, the new owners would also be burdened by it.

The first clause was reduced such that the indemnification only covers actual damages caused by construction. This means that if a neighbor decides to sue the City because they don’t like the look of my house, I’m not on the hook to defend anybody or pay anything. The second clause was modified such that the indemnification ends if and when the property is sold. This is key in preserving value, as I would flinch if I was buying a property which transferred such indemnification to me.

A lot more language was clarified as well, and I feel like the $1049.50 I owe my attorney in fees has been well worth it.

During these final stages of preparing for construction, I’ve also completed a few more tasks and spent a little more money:

  • We had the asbestos abated for $2,335.64 by Partners Construction, Inc.
  • Some additional structural engineering work from Swenson Say Faget was completed for $2,192.29.
  • Some additional geotech work was required by the City and performed by Icicle Creek Engineers for $600.
  • The additional City of Seattle fee to complete the permitting process was $3,450.75 (bringing the total permit fee to $8,911.50).
  • Printing fees of $172.91 for some additional drawing sets.

So with that, we’re almost all set to build. I’m still waiting for my refinance to close, but after that it’s all systems go. Unfortunately, the place that is going to deconstruct and recycle most of the existing house is a little booked up right now so we may be looking at July.

It’s also interesting to note that the official amount of investment it took to get to the point of breaking ground has been exactly $78,543.85.

Costs accrued during this stage:

Structural engineering services$2,192.29
Additional geotech work$600.00
Asbestos abatement$2,335.64
City of Seattle Demolition and Building Permits (Completion fee)$3,450.75
Legal fees to negotiate building permit$1,049.50

Deconstruction Complete

On July 23rd, deconstruction of the old house was officially completed. The process began on July 9th and took 8 business days (2 Monday-Thursday workweeks) to finish. I am completely satisfied and amazed at how this phase went, and I credit the great work of Noel Stout and his team at The RE Store as well as Paul Jensen Excavating for removing a 50 year old mass of brick, metal, wood, and sandstone with the delicacy of a surgical team.

A timelapse is worth a thousand words, so before explaining this phase any further, take a look at the whole process compressed down to about a minute:

Click to play timelapse

Probably the most amazing part about this deconstruction is how much material we saved from going into a landfill. I don’t have the final weight numbers yet, but essentially 40% of the house was resold to other home builders, 50% of it was recycled, and only 10% of it went to the dump. Amazing. For all the talk about building green using expensive solar panels and other technologies, this step has a much greater immediate positive environmental impact, in my opinion. I talked to Paul — the gentleman operating the excavator — and he told me he could have technically knocked the entire house down in five hours if it was all going to the dump. I ended up paying more in labor fees to deconstruct the house instead of demolishing it, but I would have paid more in dumping fees the other way. In the end, it’s better to spend your money on good, honest, environmentally-conscious labor than on dumping fees.

As an extra-added bonus, I had the re-sold elements appraised at Foss Appraisal and they came out to a whopping $18,000… about triple what I expected. This means I can write off $18,000 in donations from my taxes (note: any claim over $5000 requires this third-party appraisal).

The second-most amazing thing about this process was how little collateral damage was caused by it. One of my Japanese maples lost a branch due to a window frame falling and one of the neighbor’s garden rocks got cracked when a dumpster truck bumped into it, but that’s about it. To remove that much house off the side of a cliff with that little damage is astounding to me. The crews were all very nice too and entertained the neighbors with explanations the process.

Finally, the last amazing thing to me about this deconstruction was how freely everyone moved around in the presence of such dangerous machinery. In watching the livecam all day (I have an actual video feed on my desktop… not just the stills), I frequently saw people crossing in front of, behind, and on each side of the moving excavator arm without ever getting hit. The almost unconscious coordination these people have is unbelievable.

On to framing!

Costs accrued during this stage:

Miscellaneous excavation fees$270.00
RE-Store (deconstruction services)$18,611.69
Honeybucket rental$167.19
Appraisal fee for donated materials$270.00
Recycling/dumping fees$7,724.71

Framing complete. Sizing crisis averted.

After only five weeks, Scott and the three man crew at Alexander’s Custom Homes have successfully completed framing of the house. They will be back to install the windows and several other things later, but the bulk of their work is done… and done extremely well.

Here is the timelapse of framing phase:

Click to play timelapse

I mentioned in my last post that we encountered a few sizing “issues” during framing, two of which were solved by minor shifts in interior walls, and one of which was unsolved.

The unsolved issue centered around the feeling that, at less than 12 feet, the master bedroom was too shallow. While 12 feet is a perfectly livable depth for a bedroom, it just seemed too cramped, especially for a house designed from scratch for its owner. The girlfriend and I both felt the entire master suite was just too small so we asked Build for options, priced out. The options were:

  1. Move the entire exterior west wall of the master bedroom two feet west, enlarging the bedroom depth by two feet and shrinking the deck depth by two feet. This seemed like the most attractive option, but it was also by far the most difficult because it posed far-reaching structural problems. Turns out we would have had to re-beam a good portion of the house all the way from the north to the south. Approximate cost: $14,000.
  2. Same thing as above but move the wall six feet west instead, to the edge of the deck, eliminating the deck. This was a lot easier structurally, but losing the master bedroom deck did not seem good. Approximate cost: $10,000.
  3. Move only the section of the west wall that is glass two feet west, leaving the structural part of the wall in place. This poses no structural issues, shrinks part of the deck to a 4 foot depth and leaves the other part at a full 6 feet. Approximate cost: $1,500.
  4. Steal a foot from the already small master bathroom and walk-in closet. Approximate cost: $500.
  5. Do nothing. Cost: only disappointment.

After some heavy thinking, option 3 arose as the clear winner. It accomplished the objective of enlarging the master bedroom, didn’t cost too much, and it even improves the deck in a way, since the six-foot-depth area is a bit more private now.

So, sizing crisis averted!

There are a few very important things I learned from this process:

  1. I can’t stress how relieving it is to have a design/build firm whose interests are completely aligned with mine and who isn’t interested in nickel-and-diming me for every little change order that comes along. With many traditional architects and G.C.s, even meeting about such a change would “start the meter” so to speak. Build has been great through all modification requests and I feel very lucky to have a team that cares as much as they do.
  2. Not withstanding the above, I am a bit mad at myself for not doing more during design stage to ensure the house was sized appropriately. In looking at plans, I tended to concentrate on the more obvious questions like “where is the kitchen in relation to the living room and dining room” and “how many bedrooms are on the same floor at the master”. I really never scrutinized actual dimensions of rooms because I just figured there was a standard size for everything that would be either met or exceeded. What I should have done is physically laid out string in an open space somewhere to match the dimensions of each room in the house. Just a quick “reality check”. This lesson gave me a great idea for an invention/business that I may pursue at some point. The bottom line, however, is that it doesn’t matter who your architect is… they are going to design what they think works and if you don’t have the data to know otherwise and say something, you’ll end up with questions and change orders.
  3. In this phase of the project, I will freely admit that I have gone from a “low to medium maintenance” client to a “high maintenance” client, and I think I know why: I am a web designer. My world is not a world in which I spend months planning things with the intent of building them out to the meticulous specs of the plan. My world is a world in which you have an idea, mock something up, prototype a little, iterate, launch, and then keep iterating after that. The foundation is never set, the walls are never nailed, and the paint is never dry. Working on the web is an infinitely iterative process and designing a house is the opposite of that.

Costs accrued during this stage:

Lumber$10,732.24
Lumber$25,656.30
Lumber$1,605.84
Honeybucket rental$117.19
Structural engineering services$232.50
Structural engineering services$155.00
Structural engineering services$775.00
Printing/Reprographic fees$27.00
Framing supplies$1,774.59
Framing supplies$380.65
Framing supplies$714.93
Framing labor$4,565.87
Framing labor$27,813.40
Framing labor$5,412.38
Framing labor$5,625.25
Wood debris hauling$1,089.00
Fence Rental for 6 months$438.00

All sealed up

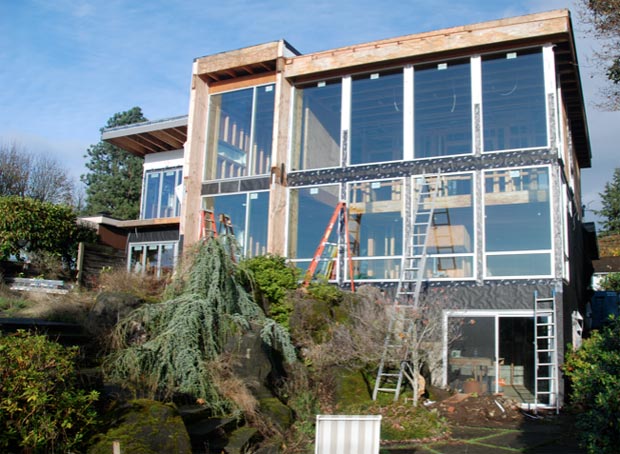
It’s been raining like the bejayyyyysus in Seattle over the last week or so, but thankfully, the majority of the house has been sealed up just in time. Last week, the framing crew at Alexander’s Custom Homes along with Build themselves, installed the following:

The largest of the Marlins weigh 350 pounds and measure approximately 9 feet by 9 feet. Unfortunately I wasn’t there to film the action, but from what I understand, it took a crew of seven to jostle some of these giant glass forms into place. I find it amazing that not a single pane was damaged or dropped.

I know I routinely say good things about Build, but when a four man design/build shop shows up on site to help physically install 350 pound windows, that is pretty special… and these guys aren’t exactly Lou Ferrigno either (check out Kevin’s arms). They also saved me a ton of money when some of the windows showed up unexpectedly unglazed due to their weight. Calling a full field glazing team in to remedy the situation would have cost several thousand dollars, but because Build provided additional sweat equity, two field glazers were able to install everything in a few hours.

For some specifics on all the glass, read on…

The windows

The State of Washington made things very easy on me, decision-wise. If you have a two-story space to glaze and you specify aluminum frame windows, there is exactly one kind of window which meets the Washington Energy Code: the Marlin 1505 Series. While this is not good from a “shopping around to get the best value window” standpoint, it’s good in that it’s one less decision to make.

Energy codes are a controversial subject. Especially in states like Washington and Oregon, some people say the codes are so strict that they dramatically increase the price of construction without proportionate reduction of energy footprint.

The Marlins have a U-value of 0.35 which is right at Washington’s limit. Smaller inoperable vinyl windows can get down to 0.15, but who wants a bunch of small, inoperable vinyl windows on their house?

The windows were supplied by Goldfinch Brothers out of Everett, WA and Marlin themselves are a Spokane, WA company so it was nice to buy local.

I will not be throwing stones anytime soon.
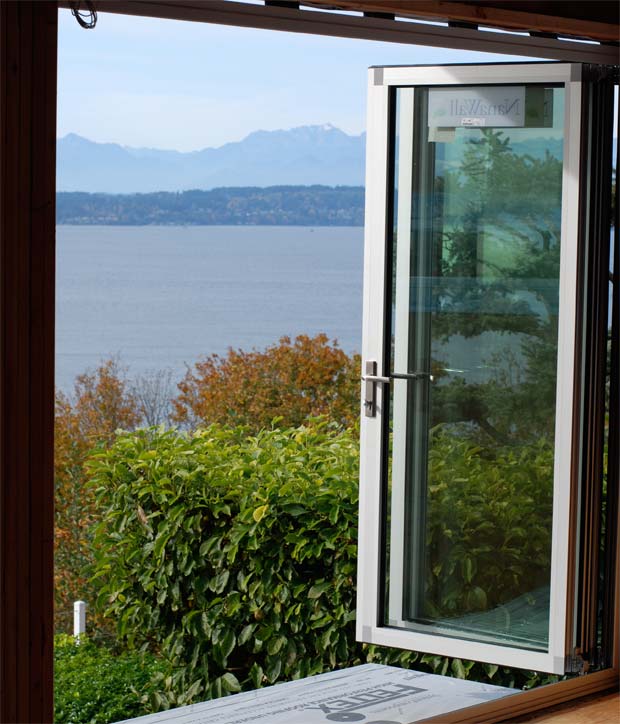
The NanaWalls

The Nanas are one of my favorite elements of the house. A NanaWall is essentially a sliding glass door that folds away like an accordion instead of sliding. The upshot of this is that the entire passageway can be opened, unlike a sliding door which is never really more than halfway open at any given time. Another nice feature of NanaWalls is that the first pane swings outward like a standard door so you can open and close it with ease. NanaWalls are especially good choices when you are trying to seamlessly connect outdoor space to indoor space, as I doing with my patio and north kitchen area. They are a little more expensive than Fleetwood sliding doors but worth it, in my opinion.

Yes, there will eventually be a safety rail and a proper deck here.

The Milgard sliders

NanaWalls notwithstanding, there were still a couple of spots that needed standard sliding doors: the basement and the dining room. When you look at Milgard sliding doors, “standard” is about the only word that comes to mind. Inexpensive and unremarkable. Kind of like anything from Old Navy.

Motorized skylights

As you can probably tell, the house isn’t exactly starved for light, but in the summer, it is critical that it has proper ventilation. In order to suck cool air in and draw hot air out, we made part of the lower west glass operable and installed two motorized skylights at the top of the double-height great room.

The skylights will be tied into the Myro home automation system as well as open and close in reaction to heat and rain.

The roof hatch

What can I say. It’s a big ugly steel hatch leading up to the roof deck. Roof access is rarely a pretty thing and this is no exception, but it gets the job done with as small of a footprint as possible.

What’s next

Now that the house is 95% dry, the space around the window frames will be waterproofed this week and the entire house will be sheathed in waterproof fabric. Once the house is all covered, the rainscreen paneling and metal roof will be installed. There should be lots of progress on the livecam for the next two weeks.

I’ve also update the gallery with shots of all the new glass.

Costs accrued during this stage:

Marlin windows and Milgard doors$47,052.15
NanaWalls (parts)$16,554.00
NanaWalls (deposit for install)$739.13
NanaWalls (remainder for install)$739.12
NanaWall Screens$2,978.00
Bilco roof hatch$5,489.56
2 Motorized skylights$2,414.48
Distinctive Windows, Inc. (field glazing)$525.60
Precision Fabricators (flashing)$657.06