Archive for the ‘Architecture’ Category

Picking an Architect

Although I’ve spent a bit of time over these last several months researching and interviewing architects, the complexity of picking a firm didn’t hit home until I realized how different each one is from the other. Being a designer myself, I felt a rapport with almost all of the 8 firms I talked to, and I had even “soft settled” on one of them for a couple of months, based mainly on how much I like the principals personally and how great their portfolio was.

As the prospect of building became more and more certain though, I felt I still had some homework to do, specifically around the subject of pricing. High end custom home architects have an awful reputation for designing without cost consciousness in mind. I’ve talked to people who’ve gone through it first-hand as clients as well as other people in the construction industry and most seem to agree that although architects are very important to the process of building a house, most are not overly concerned with building you a nice house as economically as possible, but rather building the most impressive house they can, with overspending as the main by-product. I know not all architects are this way, but from personal accounts, I also know that many are, and that’s why I have to be extra careful. Since I don’t want to spend a million dollars on construction, finding the most cost-effective high end architect has quickly become the most important part of this project.

Following is everything I’ve learned about architects over the last several weeks:

→ Read the rest of this entry

Architecture Contract Signed

Alright, Build LLC and I are now officially signed up to build a house together. It feels great to have such an important part of the process taken care of.

One of the nice things about Build is that Kevin Eckert and Andrew van Leeuwen — the principals — are very transparent about how long things will take and how much they will cost. When I went in to sign the contract with them, Kevin gave me a spreadsheet of where all time and money was expected to go, even though we were going with a flat-fee structure of $48,000. I won’t list every line item in the document, but the main sections are as follows:

  • Information Gathering and Documentation: $3,220 (42 hours)
  • Schematic Design and Design Development: $29,440 (370 hours)
  • Construction Documents: $10,430 (126 hours)
  • Pre-construction Services: $800 (8 hours)
  • General Conditions: $2790 (30 hours)
  • Contingency: $1,500

All of that adds up to $48,000, which I will be paying as I go, every month. The initial deposit, which I will pay today is $9600.

Costs accrued during this stage:

Architecture services$48,000.00

Survey Completed

The day after the deal closed, I called a few surveyors to see who charged a reasonable fee and could come out to the property in short order. It turns out they are all in the $3000 range, but some of them will charge you an hourly fee with a “not to exceed” number (better). I ended up going with Brent Eble and Emerald Land Surveying, Inc. who were able to come out to the property the very next day and charged an hourly rate with a not-to-exceed number of $2900.

Three weeks later (today), I received my survey drawings and 3D CAD file with a total bill of $2695. Not bad. I’ve already forwarded the file onto my architects and they told me everything looks great, but unfortunately, I am not able to easily import the CAD file into SketchUp. I plan on mucking around with some design ideas in SketchUp, so it’s a bit disappointing that the surface mesh the surveyor provided doesn’t seem to work very well in the only modeling app normal people like me can use. It imports, but as a series of lines instead of a true, clean surface mesh. I’ve already tried to re-convert the .dwg file from AutoCAD and ArchiCAD but since I don’t know those apps very well, I’m not making a ton of progress.

Anyway, the important part is that the survey is now done so the architects can get going on the designs.

Good old-fashioned drawings from the surveyor.

Costs accrued during this stage:

Survey$2,695.00

Analyzing the First Pre-Design Concepts

On Friday, I went in to Build to look at some initial “pre-design” work. What is pre-design work? Well, it’s mainly an attempt to apply some loose parameters to the project before actual schematic work begins. Things like:

“Should the garage stay where it’s at, or do you feel strongly about moving it?”

“Do you feel strongly about the location and bearing of the master suite?”

“Would you prefer the great room to be completely open or do you envision separator walls dividing the space a bit?”

To help answer these questions, Build drew up this matrix of four such questions and three possible answers to each question:

By seeing this matrix illustrated above, I was able to more clearly form opinions about what I like and what I don’t. Although it doesn’t come close to answering every design question, it doesn’t aim to. It’s designed solely to cast the boat off in the right direction.

As a further exploration of the above drawing, Build produced three rough concepts, each using a different permutation of the options above. The results are below:

I can’t say I want my house to look entirely like any of these three concepts, but seeing them drawn out helped solidify my opinions about the four questions and then some. Particularly, I’ve decided that:

  • The garage should stay where it’s at, on the south end.
  • The master suite should probably be in the middle, or the north.
  • The west facade should use integral columns and be as open as possible.
  • No decision on the horizontal separation of public and private space yet, but leaning towards a vertical separation.

In addition to that, the drawings solidified my opinion that the great room should be double-height and at the southwest side of the house.

All in all, a very useful meeting! So far so good!

Remodel or Build from Scratch?

When you buy a property with an existing house on it, you have several choices ahead of you. You can:

  1. Move right in and accept the house as is.
  2. Do a classic “remodel”, putting in new floors, carpeting, bathroom fixtures, and/or kitchen appliances.
  3. Tear the whole thing down and start from scratch.
  4. Tear 99% of the thing down, start almost from scratch, and call it a remodel.

Options a and b are pretty straightforward and if your house already has a great footprint and layout, you probably don’t need to think about c or d. But what if you need to completely reinvent the property? What is the best way to accomplish a total transformation with as little friction as possible?

In the United States and other countries with similar building conventions, it’s usually option d. All cities are slightly different, but generally if you keep even a single wall up, it officially counts as a “remodel”. I’ve even heard stories of people keeping a tiny portion of an existing wall up, calling an inspector out to bless it, and then knocking the wall down and rebuilding it within 24 hours.

If you get your project blessed as a “remodel” by your city’s planning department, you save yourself a lot of extra permitting, extra costs, extra arguments with the city and/or neighbors, and extra time. You’re also more likely to get special “out of code” allowances from the city if you need them. For instance, the carport in my current structure does not conform to code anymore (it’s too close to the street) and the western-most edge of the house is technically in an environmentally critical zone. If I built from scratch, the chances of getting approval to re-create these out-of-code elements would be small.

Guiding the Design Process with SketchUp

The 3D Connexion Space Navigator

I’ve mentioned Google SketchUp before as the only 3D modeling application I could wrap my brain around. Even as a professional designer who has used Photoshop, Illustrator, and a host of other applications for over 10 years, all other 3D and CAD programs are just way too complicated for me.

The great thing about SketchUp — besides the fact that you can learn it in a day or two — is that it helps you figure out in your own mind what you want your new home to look like and produces great models that you can e-mail to your architects for guidance. I’ve never had a problem expressing myself with words, but when I met with my architects a couple of weeks ago to go over pre-design concepts, I found myself sketching clumsily on vellum paper and trying to artfully explain in words what could be expressed in about five seconds with a 3D mockup. After the meeting, I went home, spent a couple of hours in SketchUp, and produced the following model:

A view of the back of the house. This would be the side facing Puget Sound.

Is it pretty? Nope. But it illustrates several important concepts I wanted to get across:

  • Double-height great room on the south side
  • Nana Wall on the northwest side connecting the dining room to the deck
  • General bedroom arrangement with a deck facing northwest from the master
  • Plenty of glass
  • Stained wood siding but only used sparingly

None of these things are meant to prescribe exactly what the house will look like, but it’s invaluable to be able to put something like this in front of your architects with only a few hours worth of work. I have another meeting with them tomorrow and they could either match the model closely or go off in another direction entirely and either could work out great, but with this model, I can at least compare their solution(s) with something that I think would work for me. I made sure to tell them not to take any style cues of the admittedly rudimentary model, but only general layout cues. We’ll see what happens. I’m excited.

While we’re talking about SketchUp, I thought I’d mention a SketchUp companion product you might want to purchase if you plan on spending a lot of time in the program. It’s called the 3D Connexion Space Navigator and it’s essentially a three-dimensional mouse which lets you zoom, pan, rotate, and orbit your model by moving your hand in a three-dimensional motion. It’s bizarrely effective and it saves you from having to constantly switch between tools in SketchUp just to view your model from the right perspective for the task you’re working on. The thing is as heavy as a large paperweight, which is necessary because in order to pan up, you actually pull up vertically on the device, and to zoom out, you push it away from you. If it was light, it would move all over your desk, but since it’s so heavy, it stays in place as you exert light amounts of force on it. Really, really cool. I got mine at Amazon.com for $57.97 including shipping and tax. Props to my buddy Danny over at Mavromatic for suggesting this.

Costs accrued during this stage:

3D Connexion Space Navigator 3D Mouse$57.00

The First Designs are In!

About a week ago, I met with Build to review their first design concepts. Build presented two separate concepts based on the pre-design meeting we had two weeks prior.

Overall, I have to say that I am thrilled with the progress. Both designs exhibit the exact design esthetic I’m looking for, while differing enough in their floorplans to present a great set of options for moving forward. I can’t stress enough the importance of hiring an architect who will show you full 3D renderings at design stage. You just can’t get a great feel for what a house is actually going to look like from a few two-dimensional schematic drawings. Below are some samples from the documents provided by Build:
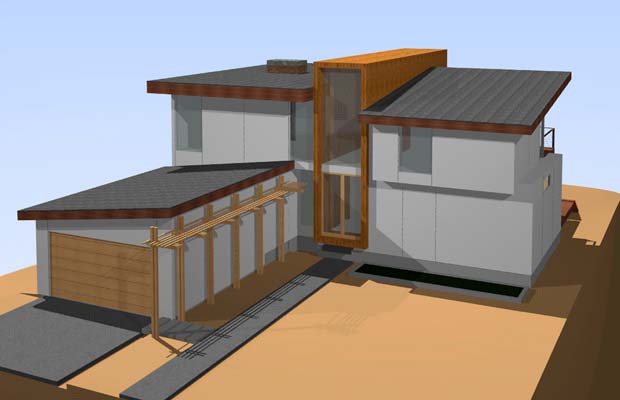
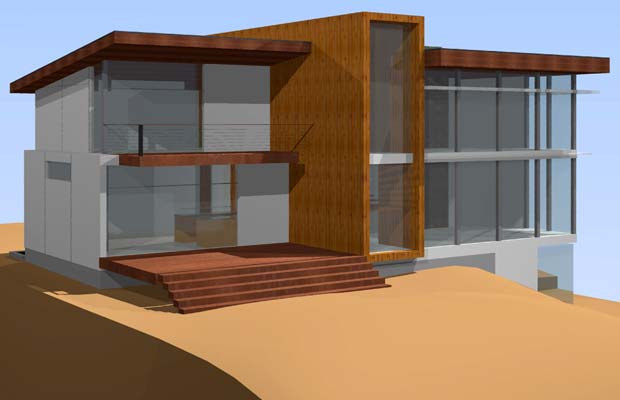
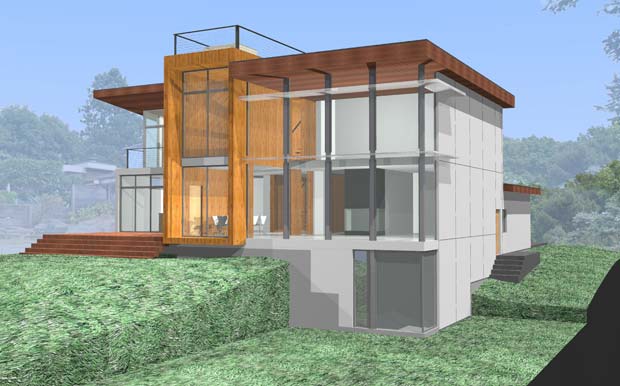
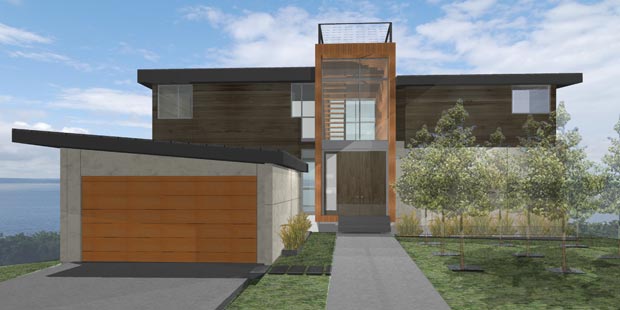
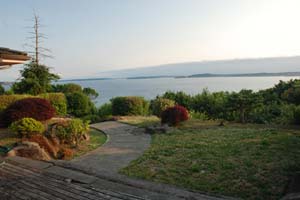
Model 1

View from northwest of the house. This is the “back” of the house, but it’s the side that faces west, towards the huge view.

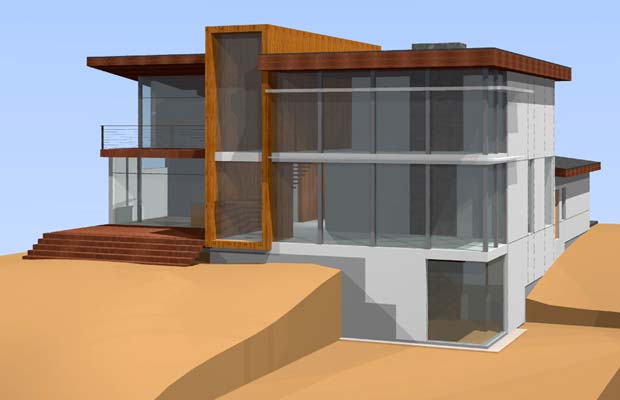
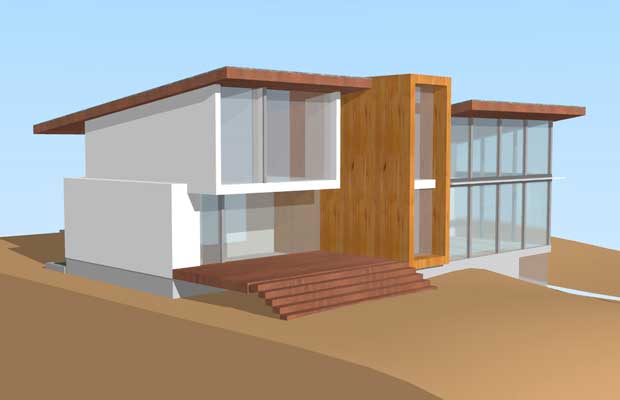
View from the lower lawn, looking up at the house.

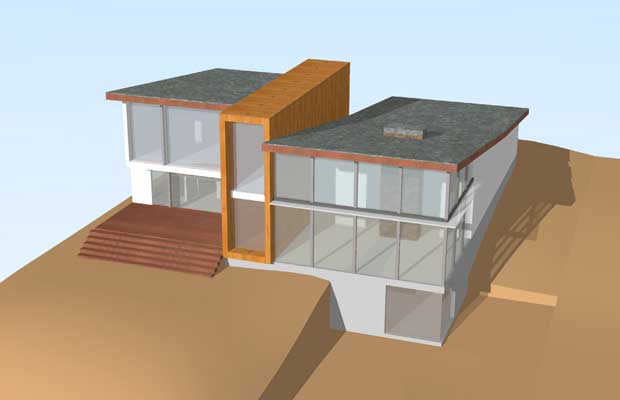
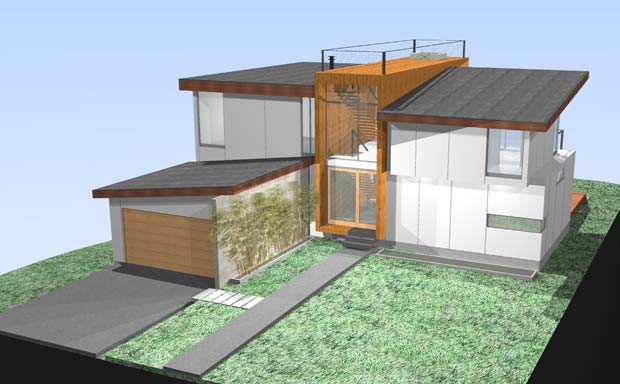
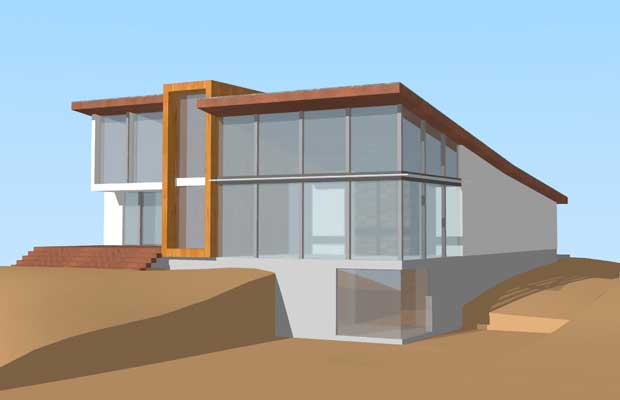
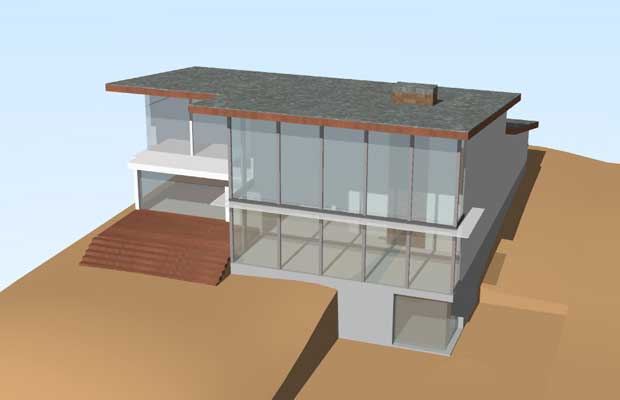
View from above. Only birds will see this, but it’s a good shot to envision how a rooftop deck might look atop the flat part.

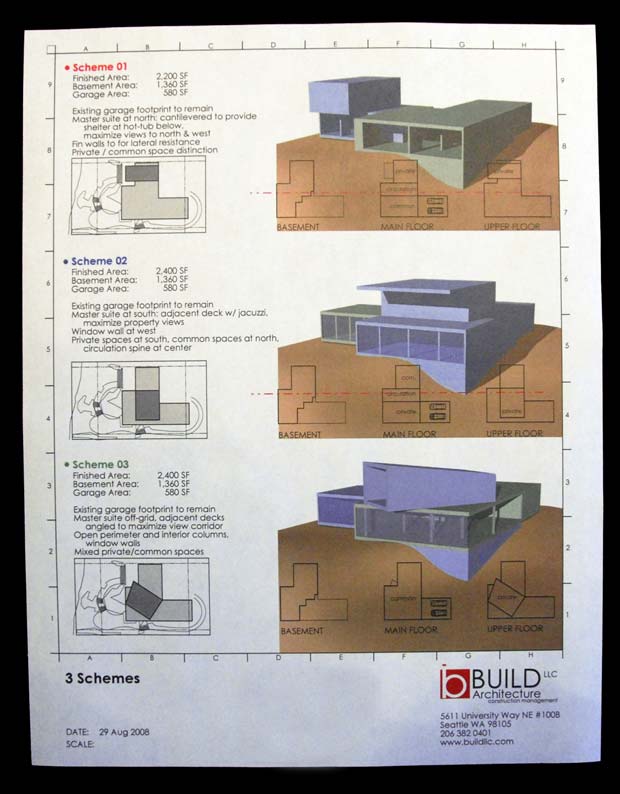
A proposed floorplan. Note that the stairwell is against the view glass and is intended as a bit of a centerpiece design element. It would certainly make walking downstairs a huge pleasure.

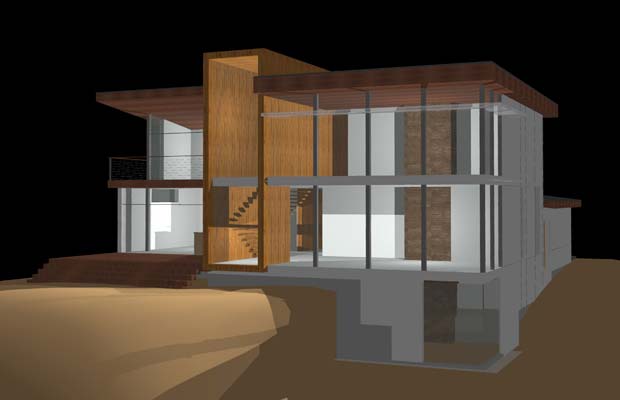
Sample elevations from all sides.

Model 2

View from above of the second model. Not nearly as nice looking as the first model, but more open.

Floorplan of the second model. Much closer to what I’m looking for than what was presented with the first model.

Thoughts on the two models

My overall impression is fairly straightforward: I like the exterior of Model 1 better and the interior of Model 2 better. I love how the rectangular structure in Model 1 breaks up the exterior of the house so it’s not so imposing looking, but I like how Model 2 puts all the bedrooms on the upper level (crucial for resale) and puts the living and dining rooms where I imagined they’d be all along.

We’re going to meet again this coming Friday at which point, Build will present a revised comp based on my thoughts and direction. The e-mail I sent them is below:

Hi guys. Great meeting today. I’m really excited by the direction and progress. Here are my thoughts:

Overall

The overall design aesthetic is more or less exactly what I’m looking for. You guys nailed that. Shed roof, not gigantic or overbearing, mid-century modern design cues, and open. As long as we pick the right exterior materials, this thing is going to perfect from the outside. Plenty modern, but timeless as well, without any elements that would scare off another owner (if god forbid, I ever had to sell).

Plan 1 vs. Plan 2

It’s probably best to start with Plan 2 and make modifications from there, merely because the interior layout seems much closer to what we’re looking for: three bedrooms on the upper.

Detailed Impressions

– There were only a few things I liked better about Plan 1, the most important being the breaking up of the north and south *exterior* sides with the beautiful wood rectangular thingie (BWRTâ„¢). I think that even if there is no interior function to the BWRTâ„¢ (e.g. to house the stairwell), it should be part of the house as an exterior design element. Probably front and back. It could be more subtle or shaped differently if need be, but I really like how it breaks things up from the outside.

– In order to create more room on the upper level, I think the double-heightness of the great room can be substantially narrower north-to-south. In other words, if you’re looking at the 3D view of Model 2 facing east, it has “5 panes worth of double-height” (Model 1 has 4). I think it could even be 3.25 panes worth, especially if we extend the great room eastward for the TV-watching area. If we go with 3.25 panes worth, the master (or a sitting area of the master) could extend into the previously double-height space (like in my model) or that space could be used for something else entirely. Basically, the double heightness could end right around where line C is in your schematic of Model 2.

– Building on the previous point, given that TV watching (and eating while TV watching) is a very common activity for us, we should probably start optimizing for that a bit. My initial feeling is that it should be in the southeast corner of the main floor since that would place it within eyesight of the great view but also potentially shielded from the glare by a half wall. Considering how far away from the west windows it would be, you might not even need a wall. If we place the TV room/space here, I would want the TV to be on the north or south wall. The other option that just occurred to me would be to put it in the north wing where the dining room currently is. This may actually be kind of nice considering the Nana Wall and the outdoor BBQ would be very useful during football and other parties that involve watching stuff on TV. If we put the TV room/space here, I’d want the TV on the south wall (where the pantry is now). As I look at it, this might be kind of cool because if you’re sitting on the couch facing southward watching TV, you may have a nice wide open view SSW through the house.

– The dining room feels right where you have it in Model 2. If the TV room/space ends up going there instead, the dining room could either go in the southeast corner or it could go in the “north living room” area where the extra couches and chairs are in Model 2.

– The kitchen should ideally serve the dining room, the TV room/space, and the living room. This isn’t a requirement or anything, but I’ve found that during parties, a lot of people tend to congregate in or around the kitchen so it would be cool to have it somewhat centrally located. That is kind of why it felt like putting it in the north living room area might be nice. I don’t want the location of the kitchen to cause us to compromise on the rest of the space though so don’t kill other spacing concepts for the sake of “no matter what” putting the kitchen in the north living room area. If it doesn’t work there, it doesn’t work there.

– It is not necessary for the wall north of the north living room to be glass. In fact, it might even be a disadvantage considering I want the outdoor BBQ against that wall. I really don’t think the view to the north is anything special from the main floor. I’d rather concentrate on maximizing that view angle from the top floor.

– I have no strong feeling about the stairs at this point. Use your judgement where they should be.

– I assume this is just because we’re still in rudimentary modeling stage, but none of the windows look like they open or could take screens. I assume at least some of the upper level windows in the great room will open and have screens.

– I don’t think we should be afraid of mixing some flat roof with some tilted roof. Maybe the north roof becomes flat to accommodate a deck and hot tub.

– I love the “open to below” element from the upstairs. Very cool. Would like to keep this if possible.

– If we narrow the double-height portion as mentioned above, maybe the BWRTâ„¢ is what gets wider and maybe that’s our rooftop deck and hot tub area? That might be kind of dope, and it would allow the north and south roofs to continue to be sloped. If the BWRTâ„¢ gets too overbearing if it is made that wide, maybe it becomes a floating BWRTâ„¢ instead. Imagine chopping off the bottom half of it essentially and have it only cut through the house from the second level on up. Just a thought… might not be a good idea.

Compromises, Already!

Building a house is an exercise in creativity and compromise. Being only six weeks into the conceptual design stage, I thought the compromise part was still pretty far away. During my meeting with Build last Friday to go over the second round of designs, however, it became clear that it was already imminent.

I already don’t want a gigantic house so I figured the compromise stage would mainly be relevant when picking fixtures, appliances, and building materials. The problem, however, is that the existing concrete foundation I’m trying to work with is already a bit too big. It’s about 1700 square feet, so a simple two-story house would weigh in at 3400 square feet. Finish out the 1300 square foot basement and you’re at a whopping 4700 square feet, not even including the garage.

I’m trying to keep the house under 3000 square feet so it’s a challenge finding areas to chop out. Although the basement level has a killer parlor room which opens out to the lower lawn and garden, I’ve decided to leave that entire level unfinished for now, mainly to save money (on both construction and the tax assessment). I figure we’ll just frame it, insulate it, run electrical and plumbing down there, and then think about finishing it years later. The rest of the house is so spacious that if the basement level didn’t even exist, I would barely miss it.

I inquired with Build as to whether we could move the north wall of the house in by 5-10 feet in order to create a bigger sideyard buffer between me and the neighbors and also to reduce the house’s square footage, but it turns out that might actually increase the price of construction because it requires some modification the foundation. We may be able to shove the garage 5 feet or so into the house footprint reducing a bit of square footage, but I’m not sure how much that will save.

Without being able to chop much off the footprint, the upper floor becomes the main opportunity to eliminate square footage. Vaulting the ceilings in the living room so that they are double-height chops off a good 500 square feet, and I already wanted vaulted ceilings, so that is a gimme. Build, however, recommended that I think about eliminating one of the bedrooms up there so that the upper floor contains only the master bedroom and one additional bedroom. While I don’t have any problem with this as it relates to me living in the house, this is officially the first time the subject of “resale” has entered into the decision making process. Many people feel that if you don’t have two bedrooms for kids on the same level as your master bedroom, your house is significantly less desirable to potential future buyers with small children. Although I hope I live in this house until I die, I’m not sure I can eliminate that bedroom and risk compromising resale value. Additionally, I feel like the two additional bedrooms on the top floor will be among the cheapest parts of the house. Drywall, carpeting, closets, and lights… that’s about it.

So with all of that, we may not be done cutting square footage yet… we’ll see. Onto other matters.

Chloe seems to like the entire stack of plans.

Build presented three separate designs on Friday to determine which layout felt most comfortable to me. Even though this meeting was supposed to zero in a little closer on a single design, I very much appreciate the fact that I was given three, considering how many variables are still up in the air. Schematics of the three designs are below. I’m concentrating on the main floor for now because that is where the majority of waking hours are spent. Once the main floor is nailed, the upper floor can follow from that.

4B is my favorite plan (by quite a large margin) because it accomplishes the following things:

  • Opens up the living room
  • Connects the media room to the living room and pushes it eastward away from the giant glass, eliminating glare
  • Places the dining room in a dramatic spot, from a view perspective, without chopping up prime main floor space
  • Locates main entrance such that it leads to a long straightaway which eventually exposes the grand view
  • Doesn’t attempt to dominate main floor with kitchen, but centrally locates it so it can serve multiple areas

It is also interesting to note that Andrew and Kevin over at Build preferred 4C. There is nothing wrong with this, but it illustrates two important things:

  1. It’s perfectly ok for your preferences to differ slightly from your architects’. If they differ tremendously, then you may have picked the wrong architect, but there is nothing wrong with putting in first place what your architect may initially put in second place.
  2. If an architect picks their favorite early on and presents it without any alternatives, they may be doing you a disservice. I love that Build followed through and presented three separate designs even though they really liked one in particular early on.

So without further ado, below are the latest plans. Overall, I’m extremely happy with the progress Build has made so far and look forward to the next meeting the Friday after this one. So far, all of the meetings have been exactly two weeks apart and that seems like the right amount of time to properly iterate. I’m not in love with how the house looks from the front just yet, but it’s still a rough rendering and we’re concentrating on the interior for now.

Front of the house

Back of the house during the day from the northwest

Back of the house during the day from the southwest

Back of the house at night from the southwest

Plan 4a

Plan 4b (the tentative winner)

Plan 4c

Zeroing in on One Design

Last Friday’s meeting was all about zeroing in on one design/floorplan and going over initial cost estimates. At this point, I’m very happy with the general floorplan and how the house looks from the back (the view side). The front of the house and the cost, however, need a bit of work. Below are the latest renderings and schematics:

Back side

Front side

Main floor

Upper floor

I think the back is looking really great. The major addition since the last renderings is the rooftop deck with the hot tub. We’re still figuring out how the roof access is going to work, but a hatch seems like the most cost-effective, least obtrusive (albeit a bit ghetto) solution.

The floorplans are also looking good, with the main floor really opening up, two flexible locations for the dining room (west edge or north edge), and an upper floor that accommodates the requisite three bedrooms. I still have a punchlist of things for Build to nudge around in the floorplans but nothing major.

The front of the house, however, is still not quite doing it for me. It just hasn’t achieved the Feng Shui that the back of the house has yet. I don’t know if it’s the angles, the paneled siding, the colors, or what, but it’s just not there yet. We’re going to experiment with some siding and color options as well as modifying the angles and lines until we achieve curb appeal nirvana.

And now for the costs.

Ohhhh the costs.

Let’s just say they are too high. It’s not Build’s fault as they are just estimating materials and labor for a house of this size and finish, but as the house is currently spec’d, it’s about $400k over my anticipated budget.

That’s a lot.

I’m not sure what we are going to do about it yet, but I’m glad we’re having this conversation at this stage rather than mid-construction. I’ve heard plenty of horror stories about architects underestimating projects only to have the homeowner vastly overextend themselves in order to finish the project. In Build’s words, they are trying to “make sure any financial surprises we run into will be positive ones”.

I like that.

We’re going to meet this Friday to discuss packages of things we can possibly save money on.

With the stock market sinking a whopping 18% last week, I have major questions in my head about what the cost of construction labor and materials will be come spring when we break ground. I have thought for the last several months that the cost of construction would decrease as the economy soured but have been told that so far, that hasn’t happened. That’s all well and good because before last week, the decline in the economy was a slow bleed, but last week was extremely damaging. It wasn’t just damaging to wall street fat cats and hedge funds. It was damaging to anyone and everyone who has any money invested in the stock or bond markets. In my opinion, it was the sort of calamity that is going to finally cause people to really watch their spending.

Everybody is always so quick to talk about how the American consumer borrows and spends above their means, but I think this episode shook a lot of people to their core. I think it canceled a lot of vacations and certainly canceled a ton of construction projects — indefinitely. When I think about how many construction projects will break ground in my neighborhood this spring, I think there is a real possibility that I’ll be the only one. Who knows.

Although the financial crisis we’re going through right now is a terrible thing, I’m hoping the cost of building a house during it will be commensurate with the reduction in wealth we’re seeing in the equity markets. If anyone has any good web sites at which to track the cost of materials, let me know. I know the cost of both lumber and copper have plummeted, but beyond that, I have no idea.

Floorplans Finalized, Front Shaping Up Nicely

Over the last week, Build successfully made the (mostly) final nudges and modifications to the floorplans, and everything is now exactly where it should be. If you enlarge the floorplans below, you will see that the media room has increased in size, a couple of sliding walls have been added, the washer/dryer have been relocated, and a few other miscellaneous issues have been resolved.

More importantly, however, the front of the house is looking much better now. During our meeting last week, we studied several different materials for the exterior of the house including corrugated metal, fiber cement, stucco, concrete, and a few different woods. Discouragingly, none of the comps that were presented made me jump out of my chair and say “that’s the one!”, but I encouraged Build to refine their rendering with more foliage and multiple camera angles and I would re-evaluate at that time. I have to say, upon leaving the office, I did have a nagging doubt in my head about whether or not the front of the house would ever end up working for me.

Not being able to think about much else, I spent my entire Friday night playing around in Photoshop, adjusting angles, colors, and a few other things. Modifying a 3D model in a 2D program is no easy task, but by the end of the night, I was able to produce a slightly modified model that already looked quite a bit better to me. I shot the model back to Build, and a few days later, they shot me an entirely new set of renderings that were much, much better than even my modded one. Thank god for modeling programs. I couldn’t imagine building a house without this sort of visual aid.

The front of the house is starting to look sharp now! See drawings below:

House front, view from straight-on

House front, view from northeast

Main floor schematic

Second floor schematic

Roof schematic

So, with everything looking great now, I need to do some serious thinking about how and where we can cut some costs associated with construction. So far, that’s proven difficult, as I’ve heard it always does. :)