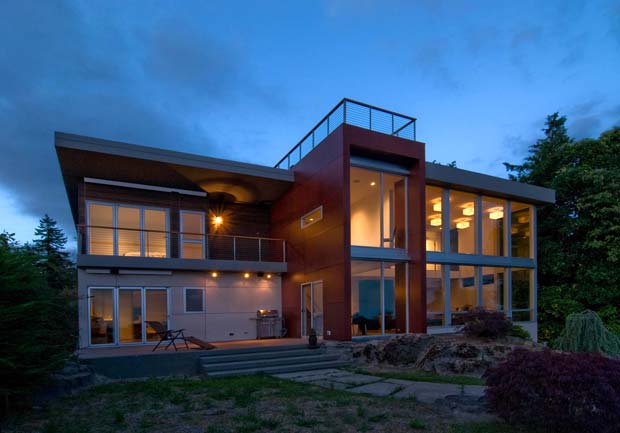
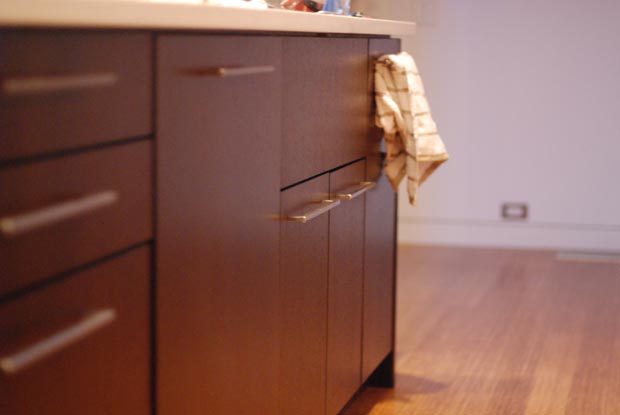
The Appliance Package

Choosing appliances can be either fun or frustrating, depending on what type of person you are. If you’re satisfied to just have decent equipment that won’t break down on you, I imagine searching the broad array of available equipment in stores and online is exasperating. If, however, you love researching features, prices, and new technologies, the whole process can be quite fun. It was fun for me. Here is what we picked and why:

Ovens

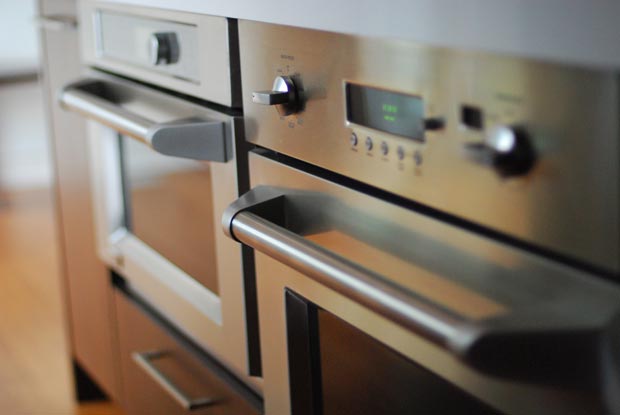
Many people will tell you if you’re building a gourmet kitchen, you need two wall ovens. We do a fair bit of cooking, but two wall ovens seemed just a tad excessive. Additionally, we couldn’t find a microwave that didn’t look cheap (seriously, even Wolf microwaves look terrible) so we came up with a great hybrid solution: one GE Monogram ZET1PMSS convection wall oven and one GE Monogram Advantium ZSC2202NSS speed oven. They both look super pro and the speed oven is pretty amazing. It can cook food in four ways, even simultaneously: with standard electric heating elements, with a convection fan, with microwave rays, and with halogen lights. That last bit is the special bit. The halogen lights allow you to enjoy the speed of microwave cooking but still get the crispiness of traditional cooking.

Nobody ever recommends microwaving a steak, but I put a 10-ounce filet mignon in the Advantium and in exactly 10 minutes, it was more or less perfectly cooked (the steak setting uses all four modes of cooking).

With this solution, we have two ovens when we need them, one microwave that doesn’t look cheap, a special way of speed cooking, and the whole setup only takes up two spaces in the kitchen island.

Cooktop

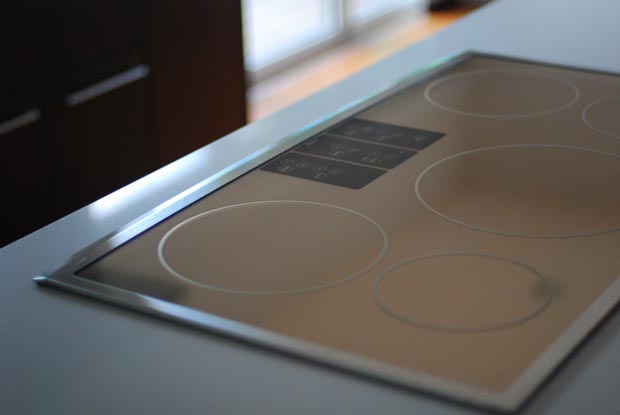
As discussed in Thinking About Induction Cooking, we thought about induction cooking. In fact, we thought so highly of it that we eschewed gas and went for the GE Monogram ZHU36RSMSS 36″ Induction Cooktop in silver. It’s been a perfect purchase so far, doing everything we expected and more. It’s quiet, safe, energy efficient, easy to clean, attractive, and oh so fast. My favorite “house demo” to do so far is pouring a quarter inch of water into a frying pan and watching it boil in under 10 seconds on the induction cooktop.

We didn’t have a whole lot of good cookware to begin with, so we purchased a set of Pro-Clad Emerilware from HSN and a couple of Le Creuset pots to make the most of the cooktop.

If you’re stuck using an electric cooktop or are thinking about putting in a gas one, do yourself a favor and check out induction. Thanks to my buddy Jim Ray of Salt and Fat for the initial recommendation and peer pressure.

Dishwasher

Based on the advice of some friends and family, we ended up choosing a Miele Optima G2472SCVI dishwasher over our previous frontrunner, Bosch. It’s very quiet and the rack space is arranged intelligently and flexibly. I don’t really have any complaints about it besides the user interface being a little, umm, austere. Thankfully you don’t really use the UI of a dishwasher too often, but it looks like it was designed ten years ago. We got a fully integrated model, meaning there are no visible buttons or surfaces (it just looks like another cabinet). I do wish the little red light that tells you the thing is on shined on the floor instead of the underside of the cabinet, but oh well. All in all, it seems like a solid dishwasher so far.

Side note: Dishwashers were probably the most infuriating appliance to research. Almost every manufacturer’s site, especially Bosch and Miele, are atrociously designed and impossible to get any useful comparison information from.

Kitchen Hood

Kitchen hoods can be the biggest ripoff of all household appliances. It’s basically a fan surrounded by some steel and these things can get into the $5000 range. Rubberduckulous. Via the recommendation of Build, we went with the sharp, understated Zephyr ZRME36BS Roma island hood. It was “only” about a thousand dollars and it’s worked great so far. It sucks a lot of air, looks great above the cooktop, and doesn’t attract fingerprints too easily.

Refrigerator

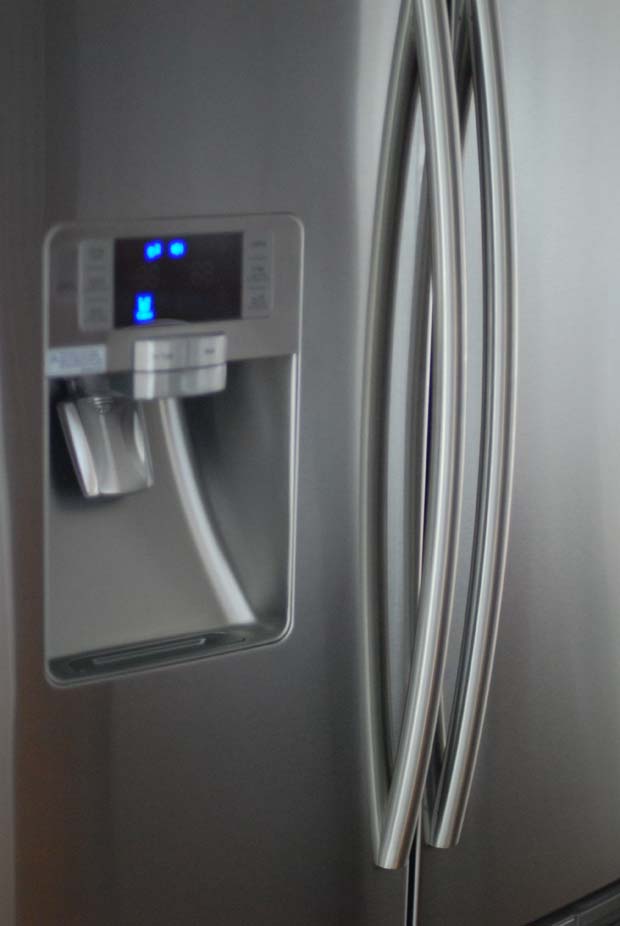
Refrigerators are one of those items you’re really best of consulting Consumer Reports for, so we did. There are just a lot of things about fridges that you can’t easily test out yourself (like how evenly they cool or how long they last without repairs) and CR has already done this work for you. Just about the only things we knew going in were that we wanted a french-door-bottom-freezer model because the layout was so convenient and that we wanted ice and water on the outside of the door. Thankfully, Consumer Reports’ top-rated model, the Samsung RFG237AARS French Door refrigerator, fit the bill perfectly. We had originally spec’d the full depth model which is several cubic feet larger, but because of how the kitchen was designed, we had to switch to the counter-depth model. So far it’s been a great fridge, although we will admit to still wishing we had been able to fit the full-depth version.

When people ask me what type of fridge I got and I answer Samsung, it often elicits puzzled looks. Usually people think of big Sub Zeros and Vikings when they think of gourmet kitchens, but read the reviews… they aren’t great. The Samsung provided us all we needed: an attractive, well designed, well reviewed fridge with all of the features we wanted for an affordable price.

Washer and dryer

Much like fridges, washers and dryers are too complicated to fully understand without the help of a place like Consumer Reports. Since we put our machines upstairs, right next to the master bedroom, our number one concern was picking the quietest washer/dryer pair on the market. The number two concern after that was how well the machines laundered clothes, and the final concern was durability. In the end, it came down to either the Electrolux EWFLS70JIW (and matching dryer) or the Samsung WF448AAW Washer and DV448AEW Dryer. We loved the Electrolux user interface and purported 18-minute “short cycle”, but according to all reports, the Samsungs were simply the quietest machines on the market and had a longer track record of reliability.

So far, the Samsungs have been spectacular. We’ve even grown to love the happyfun Korean melodies they play when they’re done with their cycles. They also have something called SilverCare which needs to be seen to be believed. Watch this Consumer Reports video test of the technology.

All in all, we’re very happy with all of the appliances we’ve chosen. Thanks also to Albert Lee Appliance Company for providing all of the non-GE appliances (I get an employee discount for the GE stuff since I work at msnbc.com). They matched or beat all online prices that I quoted over the phone to them, and as a result, got all of my business (hint: do this!).

Costs accrued during this stage:

GE Monogram 30" Convection Single Wall Oven (ZET1PMSS)$2,667.42
GE Monogram Built-In Oven with Advantium (ZSC2202NSS)$2,437.47
GE Monogram 36" Induction Cooktop (ZHU36RSMSS)$2,273.05
GE 4 year extended warrantees$328.34
Miele Optima dishwasher (G2472SCVI)$1,805.66
Zephyr Roma island hood (ZRME36BS)$999.73
Samsung Washer (WF448AAW)$1,299.77
Samsung Electric Dryer (DV448AEW)$1,192.45
Samsung French Door refrigerator (RFG237AARS)$2,206.43
Delivery charge for GE appliances$50.00
Driptite custom washer/dryer pan$141.00

Basic Painting Strategy

There’s not a whole lot to go over in this post about painting the house, but we’re pretty happy with the strategy we took so far: paint the whole interior white and decide after we’ve settled in what accent walls to paint different colors.

Too often people rush to paint their walls all sorts of crazy colors only to move in and realize the color scheme isn’t going well with their furniture or their lighting. We hired Excel Coatings to paint our exterior soffits grey (to match the metal roof), our interior walls mostly white, and we’ll be calling them back in in a couple of weeks to do a couple of accent walls for us. In the end, we’ve decided to only repaint one wall in the dining room and one wall in the kitchen. It’s really all the house needed and it should hold over us for the next 5-10 years until we paint the whole thing florescent green.

Costs accrued during this stage:

Interior house painting (Excel Coatings)$26,100.32
Paint supplies (Sherwin Williams)$161.40
Exterior house painting (Excel Coatings)$2,672.74
Post-construction painting and touch-ups (Excel Coatings)$5,290.08

Stacking the decks

Having just spent four years in a condo without a deck, the importance of nailing one’s deck strategy was clear to me from the start of this project. I wanted decks in as many places as it made sense, in order to take advantage of the property’s great views and outdoor entertaining potential.

There was already a large patio area outside where the old house used to be so that part was easy. Here’s what the patio looks like now:

Additionally, the plans called for a master bedroom facing southwest looking over Puget Sound so putting a little reading deck out there was an easy call as well. We ended up making this deck about two feet shallower so we could extend the interior space of the master bedroom out a bit, but it’s still plenty big enough for having a glass of wine or reading a book on. Here’s what it looks like:

The coup de gras grâce, however, is the rooftop deck. I don’t understand why everybody doesn’t build one of these. Flat roofs with rooftop decks are so much more useful and fun than sloped roofs with, uhhh, shingles. If you have any sort of view whatsoever, you should have a rooftop deck. Here’s how ours ended up:

Now on to some particulars…

For the material, we ended up using Trex Brasilia in espresso color. I did a ton of research into decking materials and concluded that there are no panaceas. The only wood that is as durable and trouble-free as I’d like is ipe, but it cannot easily be stained and tends to silver quickly — a look I was not interested in. Concrete pavers are the lowest maintenance option, but they feel tough on the feet and we already have enough concrete around the outside of the house. Composite decking reviews are all over the map with some installations performing well for people and others exhibiting mold and other problems fairly quickly. We ended up going with Trex because it is a brand that’s been around a long time and it looked the least fake to us. So far so good on the Trex.

For railings, we went with ipe for its low maintenance qualities. Since it’s just the railing, we don’t mind the silvering here.

For posts, we went with galvanized steel with steel cables running through them. I’m not a huge fan of how galvanized steel looks and went to great pains to minimize its use throughout the project (particularly on the awning), but considering the low profile of the posts, it was a good low maintenance material to use here.

As mentioned in the hot tub post, we went with a HotSpring Sovereign hot tub for the rooftop deck and couldn’t be happier with it so far. It might be the best feature of the house.

Costs accrued during this stage:

Decking materials (Plywood Supply)$6,211.84
Decking parts and labor (Deerly Construction)$5,441.28
Decking materials (Compton Lumber)$1,411.08
Decking materials (Plywood Supply)$2,206.22
Decking parts and labor (Brett Deerly)$4,601.40
Trex Brasilia decking material (Plywood Supply)$1,788.35
Deck railing (Feeney)$3,588.94
Deck flashing (Precision Fabricators, LLC)$592.61
Guardrail galvanizing (Scott Galvanizing)$135.78
Guardrail fabrication (Twisted Metalworks)$5,164.85

How the front yard came together

The front yard and and landscaping turned out to be one of the most pleasantly surprising parts of the entire project. Having never owned a house before and knowing very little about gardening or landscaping, we assumed the (one woman) team at Alexandria’s Creations would do a nice job for us but that we’d probably want to change a lot of stuff later on. Alex’s work, however, has turned out so beautifully that we don’t foresee wanting to change a single thing, provided all plants adapt nicely to their new environment.

A few months ago when landscaping work began, I posted details of what was going in where so I won’t rehash that again, but there are a few other details to discuss, now that everything’s done.

Irrigation

For one reason or another, I decided to axe irrigation from the budget early on… probably because we were looking for stuff to cut in order to hit a number. As landscaping plans came into focus, however, it became clear that skipping irrigation now would only mean a year or two of laborious manual watering followed by a destructive installation of proper sprinklers later. For that reason, we added it back into the plan just in time and the folks at the Hale Company came in and did a wonderful job for us. Because the driveway was already poured, Gary and the Hale team had to bore a small hole underneath it to run water there, but other than that, the install went smoothly and took about a week.

We created 4 sprinkler zones for the front and side yards and ran a water line to the backyard for if and when irrigation would be installed there. In order to tie the irrigation into our home automation system, we used the Rain8Pro from WGL Designs. It’s probably the single ugliest piece of equipment in the entire house, but it’s also one of the best irrigation controllers on the market. Because it ties directly into the automation system, we can trigger it with moisture sensors, on a timed schedule, or even from a web browser or iPhone.

The Rain8: Beaten repeatedly with an ugly stick but still outperforms its peers.

The Lawn

So far, the lawn has not proved to be very difficult to maintain. It needs a little more watering than the plants, but since it’s flat and not very big, I can cut the whole thing with a manual push mower in less than 10 minutes. We’ll see how long I go until calling a neighborhood kid in to do it, but right now, I don’t mind it at all. I think there’s a difference in having a lawn you have to mow versus a lawn you want to mow. Right now, I’m in the second camp.

The Lighting

Landscape lighting isn’t too complicated of a subject once you get the hang of it, but I have to say, it’s pretty hard to find nice looking modern landscape lights. It seems like 99% of all landscape lights are either very traditional or very cheap looking. I thought briefly about using solar lighting, but after trying it in the back yard, I found it doesn’t really flood areas with any reasonable amount of light. The ones I found all used a tiny single LED bulb which only spread light across about a two foot radius… and spottily at that.

Through the advice of someone on Twitter, I called Sidney Genette at Lighting Designs and hired him to put together a basic lighting plan for the front yard. I didn’t end up using the equipment he spec’d because I found fixtures I liked even better, but Sidney’s plan successfully lit up our paths, our lawn, and our plants.

We ended up going with some pretty expensive downlights in the BK Lighting Alpine PAR 30 (purchased from Stoller Inc.), some moderately priced path lights in the Hinkley 1579SS (purchased from LightingSale.com), and some super cheap uplights in the Malibu 20 watt cast metal flood (purchased from Home Depot).

These are the BK Lighting downlights. Solid as hell. Maybe 15 pounds each. Kind of overkill though.

The Hinkleys are the real superstars, lighting up the walkway to the front door and providing a nice, modern, subtle accent to the concrete path, even in the daytime. If the Hinkleys are an A, the next closest path light I found was maybe a C-.

Mmmm, the Hinkleys. So modern, so smooth, so perfect.

Next Up

Since we did so well on the overall house budget, Alex will be coming back in a week or so to landscape the back yard. It’s already beautiful so I can’t wait to see how it turns out.

I just posted a bunch of front yard photos to the photo gallery, so feel free to check them out here.

Costs accrued during this stage:

Landscaping design, labor, and plants (Alexandria's Creations)$7,858.04
Landscape lighting design (Lighting Designs, Inc.)$522.50
Irrigation system (Hale Company, Inc.)$5,840.44
Front lawn soil prep and landscaping (Blackhawk Construction)$5,985.27
Rain8 Pro2 sprinkler controller (automatedoutlet.com)$201.49
Cedar fencing (Special Projects Division)$558.45
Miscellaneous landscaping (Brett Deerly)$610.40
Fence refinishing/reconditioning (PJ Construction)$1,040.25
BK Lighting Alpine Lights (Stoller Inc)$528.34
Hinkley Path Lights (LightingSale.com)$1,274.40
Malibu Uplights (Home Depot)$87.34

The last miscellaneous cost post

The last of the miscellaneous costs that don’t warrant their own blog entries have been entered and this post doesn’t really serve any purpose other than to get them into the system. If you have costs turned on, you should see them below. If not, move along now… nothing to see here!

Costs accrued during this stage:

Carpentry (Rivera 26 Remodeling)$11,497.50
Door hardware$44.94
Garage door (Select Garage Door)$2,016.50
Door hardware (Builder's Hardware & Supply)$1,387.46
Door hardware (Builder's Hardware & Supply)$1,381.23
Door hardware (Builder's Hardware & Supply)$371.89
Door hardware (Builder's Hardware & Supply)$190.81
Door supplies (Builder's Hardware & Supply)$185.53
Drywall repair and finishing (PJ Construction)$1,226.40
Flooring supplies (White Cap Construction Supply)$100.14
General site work (Brett Deerly)$2,102.40
General site work (Build LLC)$10,605.00
Debris removal (Take It Away Hauling)$1,090.00
Debris removal (Take It Away Hauling)$240.25
Honeybucket rental$125.71
Scaffolding rental$793.34
Honeybucket rental$125.71
Extra two months fence rental (National Rentals)$53.34
Full house cleaning (Complete Clean LLC)$2,120.00
Final geotech certification (Icicle Creek Engineers)$1,200.00
Miscellaneous hardware (Builder's Hardware & Supply)$95.90
Miscellaneous tools (White Cap Construction Supply)$11.82
Miscellaneous expenses$2,093.34
Miscellaneous expenses$1,863.74
Staining materials (Rudd)$105.90
Miscellaneous expenses$206.46
Site work (Build LLC)$2,637.50
Miscellaneous wood materials (Compton Lumber)$182.90
Entry floormat (American Floormats)$140.70
Door stops$163.08

The Cabinet Package

One of the single biggest budget items of the house was the cabinet package. Custom cabinets are very expensive, no matter who builds them for you and what materials they use. If you’re looking to save a good chunk of change on your house project, cutting out the custom cabinets can go a long way. Short of custom, you can go with stock cabinets (like what you see at Ikea) or “semi-custom” cabinets, which are essentially pre-made but can have certain dimensions modified.

Open shelving at the end of the large kitchen cabinet makes for a nice glassware display.

I ended up spending $61,867.50 on my custom cabinets, and that included a fairly extensive ensemble in the kitchen, consoles in four bathrooms, a large dresser/armoire in the master bedroom, a full package in the walk-in closet, and a built-in desk for the office. This number could have easily been closer to $90,000 had I chosen a different cabinet maker, but could have also been closer to $20,000 if I went with stock stuff.

User interface around the house, in general, is a very big deal to me, and in the end, I felt that only custom cabinets would let me make the most out of the space and ensure that everything fit perfectly and provided easy access to the contents within.

One of my favorite interface features: dueling trash and recycle drawers for easy access.

In general, we’re happy with how the cabinets turned out, from a design and usability standpoint, but there are some color inconsistencies and visible veneer seams that we feel could have been avoided if a different process had been used. The cabinet shop that designed and produced our cabinets uses a process called “spray finishing” which we knew nothing about before embarking on this project. Essentially, there are two ways to coat a cabinet: by staining it with a paint brush and stain or by putting each piece into a booth and spraying it with clear finish. This clear finish can be mixed with “tint” to help alter the color of the wood.

We specified espresso-colored cabinets from the beginning so we figured it would just be a question of laminating some rift-sawn oak to some plywood and then staining/spraying it a dark brown. We’d seen thousands of espresso-colored cabinets before so it didn’t seem like a complicated process. The shop began showing us sprayed samples and none of them looked right. They all looked more walnut-like in color than espresso-like. After going through probably 15 samples, the suggestion was made that we try a wood called wenge, which is a lot closer to espresso-color than oak. It’s a very hard African wood and it looked really nice to us so we said ok. The wenge ended up tinting pretty nicely and was close enough to espresso that we signed off on it.

Here’s what the cabinets looked like in the shop, before finishing.

Unfortunately, a few months later, as the cabinets were installed, we noticed that the edge pieces were much darker than the faces. The reason for this is that the edges were made with wenge hardwood and not the thin veneer on the cabinet faces. The end result is sort of a “two tone” cabinet, in dark brown and much darker brown. To add to that, the color of the wenge varied from room to room and sometimes even board to board. Definitely not what we were expecting. Additionally, the porous nature of the wenge did not seem to take the spray finish evenly and needed touching up in multiple places.

A very handsome built-in desk, but note the color difference between the surfaces.

There were several things we had the cabinet shop fix, and to their credit, they were very friendly and responsive about making things right, but the cabinet color was something that couldn’t be fixed without a complete redo. Given the fact that this color could conceivably be construed as intentional and it was extremely unlikely any visitors would ever notice anything was wrong, we decided to just live with them.

The color isn’t something that bothers us every day and we’ve pretty much gotten over the entire issue, but we did learn some lessons:

  • Although spray finishing is, according to some, a high-end way to finish cabinets, do not try to radically alter the color of a wood with it. It should only be used when you are looking for a clear finish or perhaps go a shade darker. I wish the shop had apprised us of this.
  • Do not use a wood that your cabinet shop has never used before. Woods vary tremendously in how they react to coatings and you don’t want any surprises in your project.
  • Participate vigorously in the user interface design of your cabinets. Because we thought of things like where we want to toast our bread and where we want the garbage and recycle drawers to be, using the cabinets is a breeze.
  • For areas like walk-in closets, consider building cabinets with both hanger bars and adjustable shelves built in. That way, you can fine-tune the amount of hanging and folding space to suit your clothing inventory.
  • Know when to insist on fixes and when to let things go. Cabinetry is never perfect and if you insist on perfection, you’re going to end up making a lot of honest people redo their honest work.

Be sure to check out more photos of the cabinet package in the photo gallery.

Costs accrued during this stage:

Cabinets$61,867.50

Getting comfortable

Now that the house is done and we’re all moved in, I thought I’d write a short post about how the first couple of weeks have gone. Since I haven’t lived in anything but apartments and condos since going off to college, it’s been a bit strange expanding into a much larger space.

The strangest part isn’t really the size, but rather the amount of “things” to keep track of… especially entrances and exits. In a condo, your only point of security is your one main door so remembering to close and lock it isn’t difficult. Additionally, unless you’re on the ground floor, any windows you may leave open are not much of a security risk. Yes, we have a security system to tell us when these sorts of things are open, but it’s still another thing to keep track of. We also have an indoor cat and there are quite a few neighborhood outdoor cats that hang out in our backyard, so making sure those boundaries are not crossed is another concern.

Another thing that was unexpected for me with new construction is how many post move-in tweaks and fixes there are. It’s definitely not like buying a new piece of precision electronics that’s been thoroughly tested and should be flawless right off of the assembly line. New homes are imperfect. They just are. Until people begin living in them, many of their flaws go undetected. Some examples in my situation include a shower with a defective thermostatic valve, pocket doors which don’t have the proper clearance to slide unencumbered, and a built-in dresser that isn’t tall enough to hang certain garments.

I won’t lie… at first, it’s a bit frustrating seeing these sorts of things right after you move in. You’d like to think a large team of professional “testers” came through your house before you moved in to flip every switch and jiggle every bolt, but unless you hired that team specifically, it is likely they didn’t. Builders do the best they can to present as finished of a product as possible, but as a homeowner, you’re always going to find things they don’t. This is no different than my business, where we produce web experiences we think are great only to have our clients and our customers point out things we didn’t do right.

The other important part of getting settled that we haven’t completed yet is just getting everything functional and into place. TV, internet, and whole-house audio are all working now, so that helps, and we have some nice new furniture as well, but a house feels empty without art, plants, and some of the other human touches people adorn their surroundings with.

I still have probably 10 or 15 more posts to write on some subjects I haven’t covered yet, but until then, feel free to visit the photo gallery for some new shots of the completed house. Build also has a new post on the completion of the house.

The bamboo floor saga

A couple of weeks ago, I posted about the concrete floor saga. Unfortunately, this wasn’t the only “adventure” related to the flooring throughout the house. The whole bamboo situation was arguably even more stressful. I’ll start from the beginning.

In deciding what sort of wood to use on our floors, the girlfriend and I both dug bamboo for its modern, natural appearance and its sustainability (bamboo is actually a grass and not a wood). We would have been perfectly fine with a nice durable hardwood like brazilian cherry but bamboo was the first choice. In researching bamboo, the first thing we discovered was the janka scale. The janka scale measures the hardness of wood and is the primary indicator of how easily your floors will dent. I have a friend with a cheap, engineered bamboo floor and he swears he can dent the thing just by dropping his keys on it. This cheap bamboo is likely in the 1100-1200 janka range and is super-thin as well, making it a poor candidate for durable flooring.

On the other end of the scale is strand woven bamboo. Weighing in at 3000 or more on the janka scale, only a few woods are harder. Strand bamboo has a distinctive look to it that you may or may not be into, but it’s virtually indestructible, so we specified it.

The first misstep in the bamboo saga occurred here.

The wrong bamboo was ordered. Instead of receiving strand bamboo, we received Teragren Signature Naturals vertical grain caramelized bamboo in 3/4 inch thickness. While the non-caramelized variety averages a healthy 1876 janka, the caramelized version is about 30% softer (caramelizing or “carbonizing” is the process of cooking bamboo so that it darkens naturally, the side effect being that it softens). Since the bamboo looked really nice and was a from Teragren, a company known for its quality, we decided to see if we could just exchange the caramelized stuff for non-caramelized.

The distributor agreed to make the exchange and we then accepted a new shipment of non-caramelized bamboo, which we’d just darken via staining. The color we were going for was slightly darker than natural blonde bamboo; a color sometimes referred to as “honey”.

Here is when the real (non) fun started.

When the company doing our floors laid the first coat of stain down, the edges of each floor board collected stain in a manner inconsistent with the faces of the planks. The result was a light colored floor (good) with dark outlines around each board (terrible). One of the many reasons we went with a site-finished floor instead of a pre-finished floor was so the floor would be one even, seamless, gapless piece of awesomeness.

A close-up of the darkness between boards. The inital stain was much lighter than this so you can see how these seams would ruin the appearance.

The flooring company, recognizing the problem, offered to re-sand the whole floor and lay down a different treatment. Unfortunately, however, every attempt to slightly darken the floor resulted in these unsightly outlines around the boards.

I then began calling around to other flooring companies, including a very highly regarded one on Bainbridge Island, and to my surprise, some companies told me they refuse to stain bamboo for this very reason. Apparently, stain does not take evenly to bamboo and getting it to look right is more trouble than it’s worth.

Would have been great to know ahead of time! Especially from the flooring installer!

Faced with this new information, we had two choices: keep the floor blonde or stain it much darker so the dark spots between the boards would blend in. We ended up choosing the latter.

Unfortunately the fun didn’t end there either.

When the stain went down, we were actually pleasantly surprised with the look. It was more or less the color of teak, which is kind of original for a bamboo floor. When it dried the following day, the entire floor had to be covered up with protection so the rest of construction could continue (much like with the concrete floor). I noticed what I thought were some shoeprints around the edges of the walls, but since the flooring company had to come back in a few months to do the topcoat, I figured it would get fixed at that time.

When the construction started wrapping up a few months later, the flooring company came back out to put a swedish finish top coat on. Unfortunately, not only did they coat over the shoeprints, but they actually weren’t shoeprints. Turns out they were “chattermarks” and they were all around the perimeter of the main floor. Chattermarks are essentially scratches in the surface caused by subpar sanding. The stain from the bamboo collected inside the scratches and that’s why they looked like shoeprints.

When I complained, the flooring company came back out and tried to repair the situation using some floor tint, but it only made things worse. Although I hate making people redo work, the owner of the company agreed that this was not up to his company’s quality standards and that they would re-sand the entire floor again and make things right.

Although it ended up adding another week or so to the construction schedule, the floor was re-sanded and the situation was resolved. We now have a beautiful, teak-colored, site-finished bamboo floor, that should be hard enough to withstand thousands of key drops and other accidents.

The finished floor looks really great, and although it was a long process, it turned out beautiful.

Lessons learned

  • If you choose a bamboo floor, either stain it dark or don’t stain it at all. Plenty of colors are available if you go pre-finished, but site-finished floors are generally regarded as higher quality. If you are looking at strand bamboo, the two best samples I found were from Plyboo and Duro Design.
  • Investigate the janka rating of whatever material you’re thinking about and choose something above 1500 unless you don’t care about denting.
  • Quiz your flooring company and find out if they’ve ever worked with the product you’ve chosen. If I had known the company doing my floors had never stained bamboo before, I would have either chosen a different product or a different flooring company. Companies may not volunteer that they’ve never worked with a certain product before because they assume it’s not much different than what they’re used to.
  • Just like with the concrete floor situation, let your installer know right away if you’re not happy with something about their installation. You may still both agree to deal with it at a later date when construction schedules permit, but get it on their radar and hold back an appropriate percentage of payment until it is dealt with.

Costs accrued during this stage:

Bamboo flooring (parts and labor)$23,146.52

Security systems and move-in day

Tomorrow is move-in day, and what better time to talk about security systems, since there will actually be possessions in the house for the first time.

Security is kind of a tough thing to blog about since the more I publish about my setup, the easier it would be for miscreants to subvert it. I’m sure everyone reading this blog on a regular basis is an honest member of society, but you never know who might come in through Google one day. So… for that reason, I must say very little. What I will say is this though: I’m going to lay out a few details in this post about how we secure the house and then I’ll do a separate, more comprehensive post on all the great home automation we’ve built in.

To start off with, we have contact sensors on every single opening in the house. Doors, windows, sliders, Nanas, garage door… you name it. When any perimeter orifice is opened, the central alarm/automation system knows about it. This is not only useful for security but also for doing cool things like turning on lights when doors are opened.

The second layer of protection is glass breakage sensors. We have these all over the house. They work by detecting the audio frequency emitted when glass is broken. If any window in the house breaks, the alarm/automation system knows about it.

The third layer of protection is motion sensors. As the name suggests, these trigger when they detect movement in the house. Some people choose to keep these on only when the house is empty and some people have certain zones on all the time. These are also useful for doing things like automatically turning on the stair lights when you’re about to walk up or down stairs.

We also have a siren on each floor and one on the roof for maximum ear piercing delight. When the alarm triggers, a monitoring service is alerted as well as a few cell phones including mine.

There’s a bit more to it than this even, but we’ll just leave it at that for now. I will say this: if you’re building a house, do not skimp on wiring, whether it’s alarm wiring or data. It’s very tempting to ask yourself “do I really need a sensor here?”, but spend the extra few bucks and run every single wire you could possibly need. You won’t regret it. Most of these sensors are less than $20 apiece (for top of the line, great ones even!) so all you’re really paying for is your wiring guy’s labor. Well worth it.

Do not worry about overwiring. Do worry about underwiring.

I’m really looking forward to move-in day tomorrow. There are several more big posts coming including the hardwoods, the landscaping, the kitchen, and the bathrooms.

UPDATE: Nina in the comments reminded me about cameras. I totally forgot to mention those. We have several infrared, high resolution, night-vision cameras which monitor almost every angle of the house 24 hours a day. The footage is available live via a streaming server as well as recorded via a dedicated DVR. Everything is also on battery backup in case of a power failure.

The concrete floor saga

This is a post several months in the making. I’m only able to write about it now because it’s officially resolved and I’m satisfied with who I should name, who I shouldn’t name, and what the costs have been to me as a homeowner. As I’ve mentioned before on this blog, I’m very careful about naming subcontractors on this site because Google search results have the ability to make or break someone’s business, depending on what is written about them.

I have three categories I put subcontractors in:

  • Did a great job, would recommend. So far, almost everyone has fit into this category. If you do a great job, charge me a reasonable fee, and are someone I’d recommend to others, I write about you here and link to your site if you have one. Hopefully this leads to more business for you. My landscape person, Alex at Alexandria’s Creations, recently told me she’s gotten a several new clients from this site, and I haven’t even written the final glowing post on the landscaping yet.
  • Things didn’t go well for one reason or another, but the person was honest and tried to make it right. In this situation, I write about the process but keep the contractor’s name out of it. Only a few subcontractors so far have fit into this category. If I wrote about the entire process and named the company, it would have the effect of casting the company/person in a negative light, and I do not wish to do this. If you are honest and tried to make things right, you shouldn’t be subject to a full writeup about everything you did wrong.
  • Things were a disaster and I want to publicly warn readers to stay away. Nobody has fit into this category yet, but there have been a couple of situations where the final resolution saved someone from this group and put them in the previous group.

I don’t tell any workers about this system and I’ve never used it as an overt incentive/threat in order to get anything done. Not a single time. If you’re working on my house and you happen to find out about this site, you can draw your own conclusions as to how you may show up on it, but in most cases, people don’t even know about it until they get referrals weeks or months later.

Ok, now that that’s out of the way, on to the concrete floors…

In planning the “grand entrance” for the house, we had a lot of choices: bamboo to match the floors, concrete to tie in with the steel, slate to keep things affordable, and linoleum to completely ruin the entire project if we so desired.

We liked the idea of concrete the best, but because of the existing subfloor elevations and some weight issues, we couldn’t do a full, thick poured concrete floor. We were turned onto a product, however, that’s been around for quite awhile now called a “concrete terrazzo overlay” or “decorative concrete overlay” floor. It’s essentially a poured floor made of concrete and aggregate but is only an inch and a half or so thick. It was about the most expensive option available at about $9,500 for 400 square feet. This cost included in-floor heat, but it was still probably twice the cost of something like slate. Nevertheless, it was a very public part of the house, so we went for it.

Around the beginning of February, work started on pouring the floor. It was only supposed to take a week or so, including the 7-step polishing process, but it ended up taking about 2.5 weeks. A loud, dusty 2.5 weeks. When the grinding and polishing was almost done, I noticed several cracks across the floor, some of them pretty major. Concrete workers always warn you that you should expect a few cracks when you choose concrete as a floor option, but given the fact that the thing wasn’t even fully installed yet, I freaked out a little. The company tried to fix one of the cracks and it seemed to make things worse.

I wasn’t feeling very good about things at this point, but we couldn’t hold up the rest of the construction and needed to cover up the floor with protection for the next few months as other work continued. Given the fact that the company needed to come back towards the end of the project anyway to do the final polishing, the decision was made to just deal with it then (incidentally, I don’t recommend doing this… deal with everything at the time, if you can).

Well, a few months went by, we completed most of the rest of the house, and it was time to uncover the floor and bring it up to snuff. To our surprise and dismay, there were now over 20 cracks in the floor. Mind you, none of these cracks were concerning from a structural standpoint as they were all hairline in size, but to have your brand new concrete floor dominated by very visible and ugly cracks is disappointing to say the least. We called the owner of the company in to have a look and were a bit worried he’d say this was “completely normal”, but even he agreed this was out of ordinary and not something he anticipated.

One of the approximately 20 cracks. This was the worst one.

We had two options: try to fill the cracks with color-matched grout or grind the whole thing down and do something else on top of it (like more of this product or maybe ultra-thin slate tile). The decision was made to try the grout option first as it had the least project/cost impact. Unfortunately the grout ended up making the cracks even more conspicuous.

At this point, we called the company back and expressed our disappointment with the grout fix. The company did not immediately return our e-mails so we prepared ourselves for a situation where they would walk away from the project (I had paid them about $8000 so far and still owed about $1500).

Build recommended we call a company they’d used before called Cirvell that uses a product called Milestone, which is essentially hybridized portland cement. The product has a “hand-troweled” look and isn’t as “shiny and pristine” looking as the concrete terrazzo overlay, but at only a sixteenth of an inch in thickness, it could be troweled on top of the existing floor with no grinding whatsoever.

We informed the original concrete floor company that we were proceeding with the Milestone option and that we felt a refund of half of the fees paid so far was a fair arrangement for both parties. This would leave me paying $4000 for a heated concrete subfloor, plus $2500 for the Milestone coat. To his credit, the owner of the original concrete company sent us a check for $4000 and we’ve now parted ways, sadly but amicably.

Although I was obviously not happy with the concrete terrazzo floor, the way the company owner handled the refund showed me he was an honest guy and someone who cared about the quality of the product and service he was providing. He could have easily just walked away and stuck me with the bill, but making things as close to “right” as possible was important to him, and that is why I’m not interested in steering readers away from his product. He’s no doubt done hundreds of successful floors… just not mine, and for we know, there was something about the construction, or temperature, or humidity in this job which conspired to not let the product cure correctly.

Thankfully, the folks at Cirvell were able to give us an end result which we’re quite happy with. They completed their work in only a few days, for a reasonable cost, and have graciously offered to come in and fine-tune the tint of the floor after we move in, if we desire. I do not hesitate to recommend them if you’re looking at Milestone as an option in your own home.

Here’s what the finished product looks like now. Plus one for Milestone.

… and with that, the concrete saga is thankfully resolved. For more photos of the floor, please visit the photo gallery.

Costs accrued during this stage:

Concrete terrazzo floor$4,159.88
Milestone overlay (Cirvell)$2,500.00