Archive for the ‘HVAC’ Category

Heating and Cooling Plans Take a U-Turn

Sarah Palin

Turns out we’re actually not going to Drill Baby Drill.

A couple of weeks ago, in the midst of wrestling with some difficult cost-cutting decisions, Build and I met with an energy consultant to discuss the viability of equipping the new house with technologies like geothermal and radiant heat. My hope was to use both, in an attempt to be as green and comfortable as possible.

I had been told by a couple of local drilling companies that I probably only needed three 300-foot holes drilled, at $5000 apiece, to generate enough load to both heat and cool the house. Although $15,000 is a lot of money, it seemed like a good investment and the right thing to do, from an environmental standpoint.

To my dismay, however, the consultant was pretty sure I needed five holes, considering how many windows I have, and that the total drilling bill would be more like $30,000. If I was under budget or close to it, maybe I would have still considered it, but since I’m still substantially above where I want to be, it made sense to say goodbye to geothermal heat, unfortunately. I get the feeling this happens to a lot of people; swearing to use as many clean technologies as possible and then shuttering many of them along the way as costs begin to spiral. I look forward to the day when the cost of building green is not significant enough to even notice. That being said, building green is not an all or nothing proposition. Just because I’m not plunking down $30,000 for a fancy geothermal system doesn’t mean the house won’t be energy-efficient in many other ways.

The next decision revolved around radiant vs. forced air HVAC. Going into this meeting, I didn’t even think forced air would be on the table, as many people have told me that radiant heat is far superior. The problem, however, with radiant is that there is no built-in cooling. There is a “comfort system” they can build these days which runs cold water through the radiant pipes but it’s not really capable of cooling the house by more than a few degrees. Given the fact that so much of the west side of the house is glass and will transfer a lot of heat from the sun, it seemed necessary to have a full-fledged air conditioning system for those (admittedly rare) sweltering Seattle summer days.

Could we try and design a house which used breezes off Puget Sound to cool the house in the summer? Sure, but if it didn’t work so well, retrofitting for air conditioning would be difficult and expensive. Given that, the project now required full ductwork for a forced air A/C system. And given that, we were now talking about two totally separate systems for HVAC: radiant pipes for heat and forced air for A/C. Expensive, and arguably overkill.

On top of these complications, the energy consultant also warned me that radiant heat is not nearly as fast as forced air at changing the temperature of a house or a zone in the house. Radiant can take 2-3 hours to do its job while forced air is more like a matter of minutes. While this usually isn’t a big deal because most people keep their house at a relatively constant temperature, my house may present a difficult challenge because of all the west-facing glass (this is becoming a theme, I am noticing): on a cold, clear winter morning, it may be 30 degrees outside and the heating system would probably be cranking. But as soon as the sun hits the west glass in the afternoon, that could warm the house up naturally quite a bit. At that point, the heating system needs to ease up a bit. And then when the sun goes down, it needs to crank back up. Radiant heat is simply not as good as forced air for quickly adjusting to these sorts of things. And on top of that, radiant heat does not work perfectly under wood floors. It’s generally best under concrete, slate, or tile.

So anyway, with all of that to consider, I made the call to move forward with a natural gas powered forced air heating and cooling system. I may do a mini radiant heating pad to warm up the master bathroom tile, but that’s it. On the downside, it’s not as forward-thinking of an HVAC system as I was hoping for, but on the upside, it should be more comfortable, and it saves me probably $40k-$50k in total.

Plumbing and HVAC work in progress

A couple of weeks ago, plumbing and HVAC work began. There’s not a whole lot to see on the livecam (which is good because it’s been busted for a few days… need to reboot) but lots of work is happening very quickly. Below are some of the specifics of what’s going in.

Plumbing

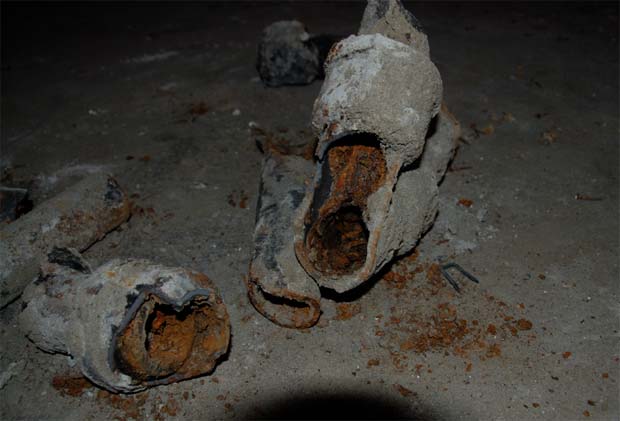
For the pipes, we chose PVC and PEX over copper. It’s cheaper, easier to work with, and has no significant disadvantages other than it isn’t supposed to be exposed to sunlight. I am so glad we took this house down to the foundation and replaced everything because the old galvanized steel pipes were in disgusting shape.

Imagine the sweet, sweet nectar that ran through these puppies.

For shower hardware, we went with the Purist line from Kohler with a few bodysprays as well. We opted against a steam shower for both cost and moisture reasons.

For the bath, we went with the Origami from Bain. You aren’t supposed to use oils or salts in normal jetted tubs so we went with an airbath. It’s a nice simple design and supposedly Bain is the best brand to trust. For the tub filler, we went with the Cascade Bi-Tech 14200, which roughly matches the faucets.

For the faucets, we are either going with Dornbracht 33 500 625 or a knockoff built in China called the Taron. Apparently there was a huge lightning-induced fire at the Dornbracht factory in Germany this summer and it has caused dramatic delays in getting product from them. I wasn’t crazy about spending $500 a faucet anyway, so we may just see how the $225 knockoffs do instead. I’ll have a separate post on this shortly.

For the master bathroom sinks, we’re going with the Ronbow CB3028 and for the powder room sink, it’ll be the hard-to-find Laufen Palomba.

For the commodes, we’re going with the Toto Pacifica line. Notably, we are avoiding dual-flush models because I’ve heard that the “half flush” option ends up never getting used. I wanted to use wall-mounted commodes, but the cost and extra complexity in fixing any “problems” kept me away.

The only thing up in the air is whether or not we will be running a hot water recirculation line. The system was spec’d without it, but as soon as I found out the delay in getting a hot shower in the morning could be a minute or more, we’re looking into how much it would cost. I’ve lived in apartments and condos for most of my life so I’m used to only waiting 10 seconds or so for hot water, so the thought of building a house like this and downgrading significantly in that area is not appealing.

HVAC

Most significantly, we’re going with a forced air heating and air conditioning system powered by a Rheem 5 ton 16 SEER 2 stage heat pump, with a Rheem 100,000 BTU variable speed 80% efficient gas furnace as a backup. I would have loved to do radiant heat but since we wanted air conditioning as well, that would have required buying, installing, and operating two completely different systems. Instead, we’re just doing electric radiant pads in the master bathroom and underneath the concrete hallway on the main floor.

A friend of mine who built a house told me the biggest mistake he made was not having a system which could service multiple zones independently. In other words, the ability to turn off basement heat, send a bunch of heat to the main floor to get it to 70 degrees, and send maybe not quite as much heat to the upper level to get it to 70. Or, to leave all A/C off on a summer night except for on the upper level where the master bedroom is. We had originally looked at doing separate systems for each floor but eventually settled on one system that can service three zones independently. There was some initial confusion between Build and I about what a multi-zone system really is. By multi-zone, I mean “the ability to control multiple zones with multiple thermostats, all electronically, and without having to physically open and close vents”. If you’re spec’ing your own system, make sure you make this clear.

I’m not sure what thermostats are going in (I think HAIs maybe), but they will all have the ability to tie into my home automation system for remote administration.

Our HVAC contractor is Anderson Nesler, Inc..

I’ll have everything broken down by price once this stage of construction is complete.

Plumbing and HVAC rough-ins complete

The plumbing and HVAC rough-in work is now essentially complete and electrical work has begun. Details of the plumbing and HVAC equipment are available at this previous post, but essentially, the piping, the ducting, and the gas furnace are now all installed. Lots of other stuff, like the heat pump and the fixtures come later.

The crew at Anderson Nesler has done a great job on the HVAC, building an intricate but efficient maze of ducting, and cramming the furnace into a tight crawlspace so as to minimize impact on livable area.

Costs accrued during this stage:

HVAC rough-in$20,268.00
HVAC rough-in$5,791.00
HVAC rough-in$2,895.00
Plumbing rough-in$1,341.00
Plumbing rough-in$8,048.00
Plumbing rough-in$8,815.00
Sewer line video inspection$130.00
Honeybucket rental$117.00

We Have Fire

Drywall is almost done and siding is finishing up, so I thought I’d write a little about the fireplace that was installed several weeks ago and how we picked it.

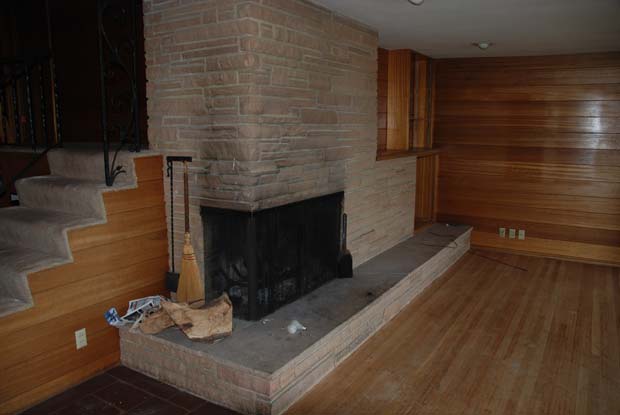
Before we took down the old house, there was a bit of discussion about keeping the old wood burning fireplace. I don’t mind traditional fireplaces at all, and the existing one carried with it the benefit of being able to heat both the basement and the main floor. In the end, however, the masonry just took up too much space and didn’t fit the overall design plans. I was not sad to see it go, but I think Build might have shed a tear.

The old hotness

In shopping for a new fireplace, it quickly became clear that if I wanted something that wasn’t going take up a whole lot of room, a gas or denatured ethanol burning one was the way to go. Although the ethanol burning ones were really sharp looking and flexibly designed, it seemed silly to buy one considering I’m already running a natural gas line to the house. The choice between never refilling my fuel supply and doing it every few/several weeks was easy.

When it comes to natural gas fireplaces, you can either go with direct-vent or vent-free. In a direct-vent setup, air is drawn in from outside the house while the fumes are blown out the same way. In a vent-free setup, air is drawn from the interior of the house, heated up, and then blown back into circulation. While vent-free fireplaces are generally thought to be safe enough, they do reduce the oxygen level inside a house, and some people point to this as a potential hazard. They are also a potential carbon monoxide hazard if improperly designed. For these reasons, it didn’t make any sense to go vent-free, considering running a vent was relatively easy.

Another important safety consideration is purchasing a fireplace that is “UL Listed”. This designation means that an organization called Underwriters Laboratories has tested the product for safety. Many insurance companies will not cover damage caused by non UL Listed fireplaces, so unless you’re not worried about burning your house down, it’s best to stick with UL Listed equipment.

If you’re looking for a direct-vent gas fireplace, your options are abundant. There are probably 1000 models to choose from. If, however, you want a modern looking one without fake logs or other distracting elements, your choice of manufacturers drops to about 4. Not only that but your price explodes into the ridiculousphere.

To see what was out there and how much it would cost, I contacted three fireplace dealers in Puget Sound and was less than impressed with the results. Two of them had nothing modern and weren’t particularly interested in pointing me elsewhere. The third one, Kirkland Fireplace, was even worse. I called to explain what I was looking for, and the guy on the other end told me he’d e-mail me some models to choose from. After a week, I still had not received an e-mail from him. Then I called again, told a new guy what happened with the first guy, and after apologizing he said he would send me the information. One more week went by with no email, no phone call, and no other follow-up from Kirkland Fireplace.

I don’t understand how a place like this stays in business. It’s like I’m calling them up and saying “Here, I have $5000 I want to place into your hands” and they are saying “Thanks, but we’re playing X-Box right now.” Especially in the middle of a severe economic/housing downturn, it shocks me that a place like this would be so unresponsive to unsolicited business. If you’re looking for a fireplace, I would stay away from Kirkland Fireplace.

After researching the options from Montigo, Spark, and Lennox — the only UL-listed modern gas fireplaces available in the U.S. — I happened upon the spankin’ new Heat & Glo site.

“Heat & Glo” you say?!?!

Yes! The trusty old manufacturer of fireplaces your grandparents would own.

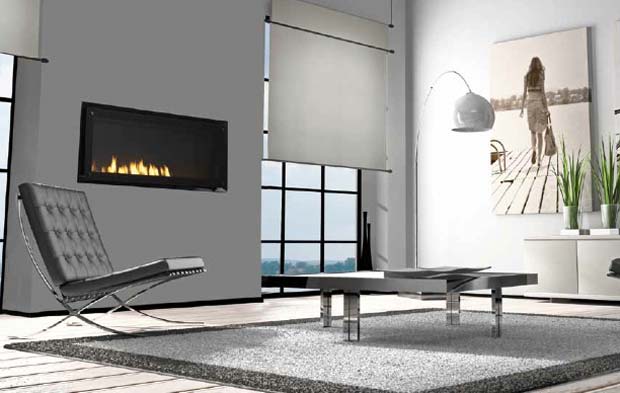
Turns out Heat & Glo now makes a line of sharp looking modern fireplaces at convenient sizes and lower price points than their competitors. There were two models that looked great: the Red 40 and the Cosmo SLR. Both models were similar in appearance but the Cosmo was less expensive and didn’t have the crazy LED stuff I didn’t need. At just over $4000 delivered and installed, the Cosmo SLR was less than half the price of some of the other options (again, I can’t believe how expensive a simple gas burner can be if it’s marketed as “modern”… non-modern models can be had for $750).

Upon deciding to go with the Cosmo, the only question was where to purchase. Thankfully, I found Bill at Fireside Hearth & Home who hooked me up, delivered and installed the thing within three weeks, and gave me great service along the way.

The new hotness (photo from Heat & Glo)

The fireplace isn’t connected yet because we’re still waiting for the gas line, but it’s sitting pretty, ready to light up the living room right now. We’ll be hooking up the gas line and installing the blackened steel fireplace surround in the coming weeks.

UPDATE: For a look at the finished fireplace, complete with custom blackened steel surround, see this post.

Costs accrued during this stage:

Heat & Glo Cosmo SLR Fireplace$4,319.00